

Nothing ruins a camping trip or overnight guest situation faster than discovering your Ozark Trail air mattress has sprung a leak in the middle of the night. That frustrating deflation happens to nearly every air mattress owner at some point, but the good news is most Ozark Trail models can be repaired successfully with the right approach. Whether you’re dealing with a tiny puncture from a stray pine needle, a leaking valve, or a separated seam, this guide delivers proven repair methods that work. You’ll learn exactly how to identify damage, prepare surfaces properly, apply patches correctly, and select the best repair products for lasting results—saving you from unnecessary replacement costs.
Ozark Trail air mattresses use PVC or vinyl construction that responds well to proper repair techniques. Most damage scenarios can be addressed with DIY methods when you understand the specific materials involved. This comprehensive repair guide covers everything from quick field fixes to thorough home repairs, ensuring you have the knowledge to handle any situation. With the right products and techniques, you can restore your air mattress to full functionality and extend its lifespan for many more camping trips or guest visits.
Gather Essential Repair Supplies for Ozark Trail Mattresses

Before attempting any repair, collect the specific materials needed for your Ozark Trail air mattress. Having everything ready prevents interruptions during critical adhesive curing phases. The right supplies make the difference between a temporary fix and a permanent repair that lasts.
For most punctures and seam separations, liquid adhesive repair products deliver the strongest results. PVC Stitch Liquid Patch stands out as the top-rated solution with a 4.3-star rating from over 2,100 reviews at $15.99. This heavy-duty formula specifically designed for PVC and PU materials cures in approximately 3 hours and creates waterproof bonds that withstand regular use. The 20ml container handles multiple small repairs effectively. For larger damage areas, consider the Inflatable Repair Patch Kit with 80ml Glue at $8.99, which provides excellent value while maintaining strong repair capabilities.
Pre-cut patch kits offer convenience for quick fixes without adhesive mixing. The 10Leccion 20 Pack of TPU Pool Patch Repair Kit delivers exceptional value at $7.99 with 20 pre-cut patches and a 4.1-star rating from over 2,200 reviews. These peel-and-stick patches work excellently for field repairs when you need a fast solution. The HOOK UP Inflatable Repair Patches justify their $12 price tag through convenience—no glue required, waterproof construction, and immediate application suitable for on-the-spot repairs during camping trips.
Beyond adhesive and patches, gather essential preparation materials: mild soap, water, isopropyl alcohol, soft cloths, and fine-grit sandpaper (400-grit or higher). A soft marker helps identify leak locations during inspection. For valve repairs, compressed air helps clear debris from valve seats. Having these materials ready ensures smooth workflow throughout the repair process.
Find All Leaks and Damage Before Repairing
Thorough damage identification prevents missed leaks that would require repeat repairs later. Air mattress damage often includes multiple puncture sites, particularly when sharp objects are involved. A systematic inspection approach ensures you address every issue in one repair session.
Inflate the mattress fully and listen carefully for escaping air while running your hand slowly across all surfaces. Pay particular attention to seams and valve areas where leaks commonly develop. Small punctures produce subtle hissing sounds, so conducting this test in a quiet environment improves detection accuracy. For extremely small leaks, submerging the inflated mattress in water reveals bubbles emerging from damage sites—this method identifies leaks invisible to audio inspection alone.
Seam separations require close visual examination since these failures may not produce audible leaks at rest but lose pressure when weight is applied. Examine welded joints along all edges and internal chambers, looking for any gaps or peeling between material layers. Run your fingers along seams while the mattress is inflated to feel for escaping air that might not be audible. Mark all identified damage locations with a soft marker to ensure complete repair coverage.
Valve inspection completes your damage assessment. Remove the valve cap and inspect the interior for debris that might prevent proper sealing. Check the valve body for cracks or damage that could cause leaks. Sometimes valve issues stem from worn seals rather than the valve itself—identifying the specific problem guides your repair approach. Document all damage locations and types before proceeding to surface preparation.
Prepare Surface for Patching Like a Professional
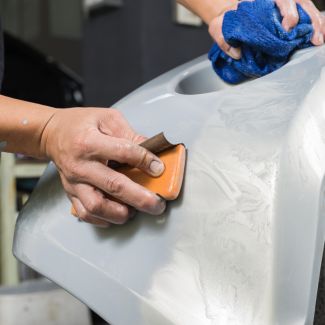
Surface preparation directly impacts repair longevity, making this step critical for successful fixes. Proper cleaning removes contaminants that interfere with adhesive bonding, while appropriate surface roughening creates better adhesion texture. Taking time with preparation pays dividends through extended repair lifespan.
Begin by cleaning the damaged area with mild soap and water, removing all dirt, oils, body lotions, and debris. Pay particular attention to areas around punctures where skin oils may have accumulated. For vinyl and PVC surfaces, a thorough cleaning with isopropyl alcohol after soap washing removes residual oils that water-based cleaning might miss. Work outward from the damage center in circular motions to avoid spreading contamination.
Allow the cleaned surface to dry completely before proceeding—moisture creates a barrier between adhesive and material, resulting in weak bonds. Air drying for 15-30 minutes ensures complete moisture evaporation, though warmer temperatures accelerate this process. While waiting, avoid touching the cleaned area to prevent oil transfer from your skin.
For PVC and vinyl surfaces, light sanding with fine-grit sandpaper (400-grit or higher) creates microscopic texture that improves adhesive contact. Sand gently in a circular motion, focusing only on the immediate repair area without enlarging the damage. This step is optional but significantly improves bond strength, particularly on smooth vinyl surfaces. Finish by wiping away sanding residue with a clean, dry cloth before applying adhesive.
Apply Patches Correctly for Permanent Repairs
Proper patch application creates permanent repairs that withstand regular use and water exposure. Following manufacturer instructions for your specific adhesive product ensures optimal results, though general principles apply across most repair solutions.
For liquid adhesive products, apply thin, even layers to both the repair surface and patch material. Most formulations require the first layer to dry to a tack-free state before applying a second layer—consult your product’s instructions for specific timing. Press the patch firmly into place, working from the center outward to eliminate all air bubbles. Rolling pressure with a smooth object like a credit card helps ensure complete contact between patch and mattress surface.
Maintain firm pressure for the duration specified in product instructions, typically 2-5 minutes for initial set. Some users report success using weights to maintain pressure during curing, particularly for larger patches or repairs on curved surfaces. Avoid touching or disturbing the repair during the critical initial cure period, as this can disrupt bond development.
Curing times vary significantly between products, ranging from 3 hours for fast-curing formulations to 24-48 hours for complete strength development. Most manufacturers specify both initial cure times (when the repair can handle light handling) and full cure times (when maximum strength is achieved). Resist the temptation to inflate the mattress before full cure completion—internal pressure can disrupt developing bonds and cause repair failure. Temperature and humidity affect curing rates; warmer temperatures accelerate the process while cooler conditions slow it.
Repair or Replace Faulty Ozark Trail Valves

Valve problems represent a significant category of air mattress failures and require specific diagnostic approaches before attempting repair. Identifying the exact valve issue prevents wasted effort on repairs that won’t address the underlying problem.
Debris-related valve leaks are the most common and easiest to fix. Remove the valve cap and inspect the valve interior for dirt, sand, or other obstructions. Use compressed air to blow out debris, or gently probe with a soft tool to dislodge stubborn material. Check the valve seat for any damage that might prevent proper sealing. Often, this simple cleaning resolves leakage issues that seem like more serious problems.
Worn valve seals can often be replaced without replacing the entire valve assembly. Consult manufacturer instructions for your specific Ozark Trail model to understand the seal removal and installation process. Replacement seal kits are available through outdoor equipment repair suppliers. This option costs significantly less than valve replacement while restoring proper sealing function.
Cracked valve bodies require complete valve replacement, which involves cutting out the damaged valve and installing a replacement using PVC cement designed for inflatable equipment. This repair requires more technical skill and specialized materials. If you’re uncomfortable with this process, consider whether professional repair or mattress replacement makes more sense for your situation and budget.
Prevent Future Ozark Trail Air Mattress Damage
Proactive protection reduces repair frequency and extends your air mattress lifespan significantly. Simple precautions during use and storage prevent most common damage types.
Always use a protective ground cloth beneath air mattresses when camping. This barrier prevents punctures from ground debris, sharp rocks, sticks, and insects that could penetrate the mattress material. Select ground cloths specifically designed for air mattress protection, or use waterproof tarps sized larger than your mattress with edges extended beyond the sleeping area.
Avoid placing air mattresses directly on rough concrete, gravel, or thorny vegetation. When using air mattresses indoors on hardwood or tile floors, consider using a protective pad or blanket beneath high-traffic areas. Pet owners should ensure claws are trimmed and consider using mattress protectors designed to resist pet-related damage.
Proper storage prevents material degradation that leads to future failures. Clean and dry the mattress completely before storage—moisture promotes mold growth and material deterioration. Deflate fully and roll loosely enough to avoid tight creases that stress material over time. Store in a cool, dry location away from direct sunlight, and use UV-resistant storage covers if prolonged sun exposure is unavoidable.
Know When to Replace Your Ozark Trail Air Mattress
While most damage responds well to DIY repair, certain situations warrant replacement rather than continued investment in repairs. Generally, if damage exceeds 10% of the mattress surface area or requires more than three patches, evaluation against replacement cost makes sense. Compare the total repair material cost against the price of a comparable new mattress.
Age-related material degradation limits repair effectiveness even with perfect technique. PVC and vinyl materials become brittle over time, developing weak points that fail despite proper repair. If your mattress shows signs of general deterioration—thinning material, discoloration, or multiple small leaks in different areas—replacement likely provides better long-term value than continued repair investment.
Valve failures on older mattresses sometimes indicate broader material stress. If multiple valves fail or the valve area shows significant material degradation, the structural integrity of the entire mattress may be compromised. In these cases, replacement ensures reliable performance for your camping or guest needs.


