
Your mattress silently absorbs sweat, dead skin cells, dust mites, and occasional spills while you sleep—yet most people forget to clean this critical sleep surface for years. Steam cleaning stands as the most effective method to deep-clean your mattress without harsh chemicals, using high-temperature steam to kill bacteria, dust mites, and their eggs while breaking down stubborn stains. Since we spend one-third of our lives in bed, maintaining a hygienic mattress directly impacts your health and sleep quality. This guide delivers step-by-step instructions to safely steam clean your dirty mattress, including equipment recommendations, drying techniques, and critical mistakes to avoid that could damage your investment.
Eliminate 10 Million Dust Mites: Health Benefits of Mattress Steam Cleaning
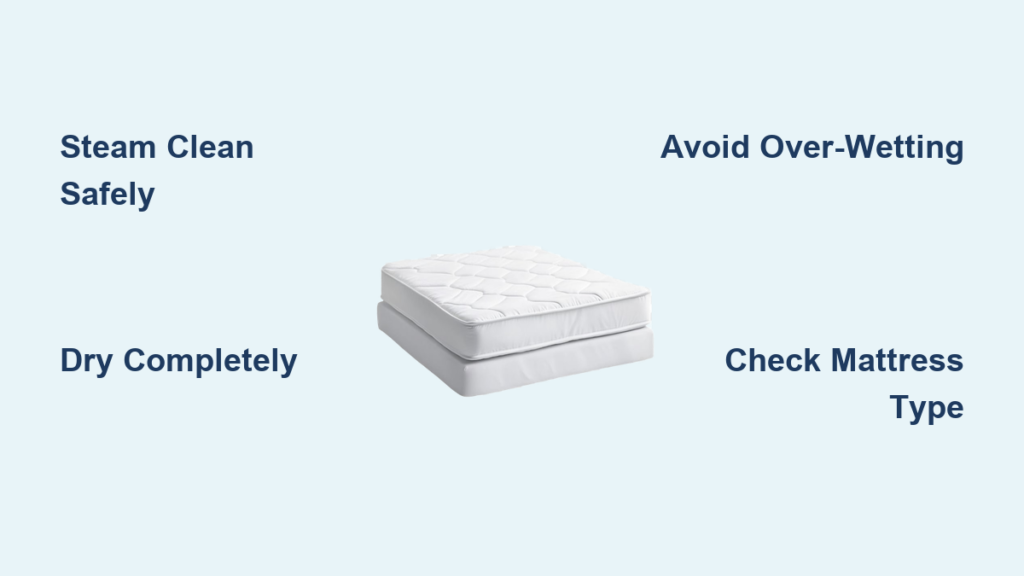
Why Your Mattress Needs High-Temperature Sanitization
The average used mattress harbors between 100,000 to 10 million dust mites—microscopic organisms feeding on dead skin cells you shed nightly. For the 76 million Americans with asthma or allergies, these invisible inhabitants trigger symptoms that disrupt sleep and daily life. Steam cleaning destroys dust mites and their eggs by exposing them to temperatures between 212°F and 250°F, the thermal threshold where these pests cannot survive. Unlike surface cleaning, steam penetrates deep into mattress fibers to eliminate bacteria, viruses, and pathogens that accumulate from sweat and body oils—creating a genuinely hygienic sleep environment rather than just masking odors with fragrances.
Extend Your Mattress Lifespan While Protecting Your Health
Regular steam cleaning preserves your mattress investment by removing the buildup of oils and dead skin cells that degrade comfort layers over time. This deep sanitization prevents set-in stains and discoloration that prematurely age your mattress. Most quality mattresses represent a significant financial commitment, and proper maintenance through steam cleaning can extend their usable lifespan by several years. For households with children, pets, or immunocompromised individuals, this thorough cleaning method provides essential protection against allergens and pathogens that affect health and sleep quality.
Must-Have Tools for Effective Mattress Steam Cleaning (212°F+ Required)
/how-to-steam-clean-a-mattress-5101192-hero-0a1a68a684094d4588f265761ec6fbc6.jpg)
Essential Equipment Checklist
Before starting, verify your steam cleaner reaches at least 212°F—temperatures below this threshold won’t kill dust mites effectively. Consumer-grade steam cleaners work for routine maintenance, but rental commercial units from equipment stores deliver superior results with sustained high heat. Pair your steamer with a vacuum cleaner featuring upholstery and crevice attachments to remove debris before steaming. Never use household carpet steamers that lack sufficient heat output or clothes steamers/irons that can’t cover large surface areas efficiently. Professional-grade machines like those from Zerorez or Stanley Steemer generate ideal temperatures (212-250°F), but rental options provide similar capabilities at lower cost.
Materials That Boost Cleaning Results
Stock these materials before you begin:
– Baking soda for deodorizing and moisture absorption (1 cup per twin mattress)
– White vinegar to enhance stain penetration (especially for urine accidents)
– Essential oils like eucalyptus or lavender for natural dust mite deterrence
– Hydrogen peroxide, dish soap, and baking soda mixture for urine stains
– Clean microfiber towels for blotting and moisture testing
Pre-Steaming Prep: Vacuuming and Baking Soda Treatment Steps
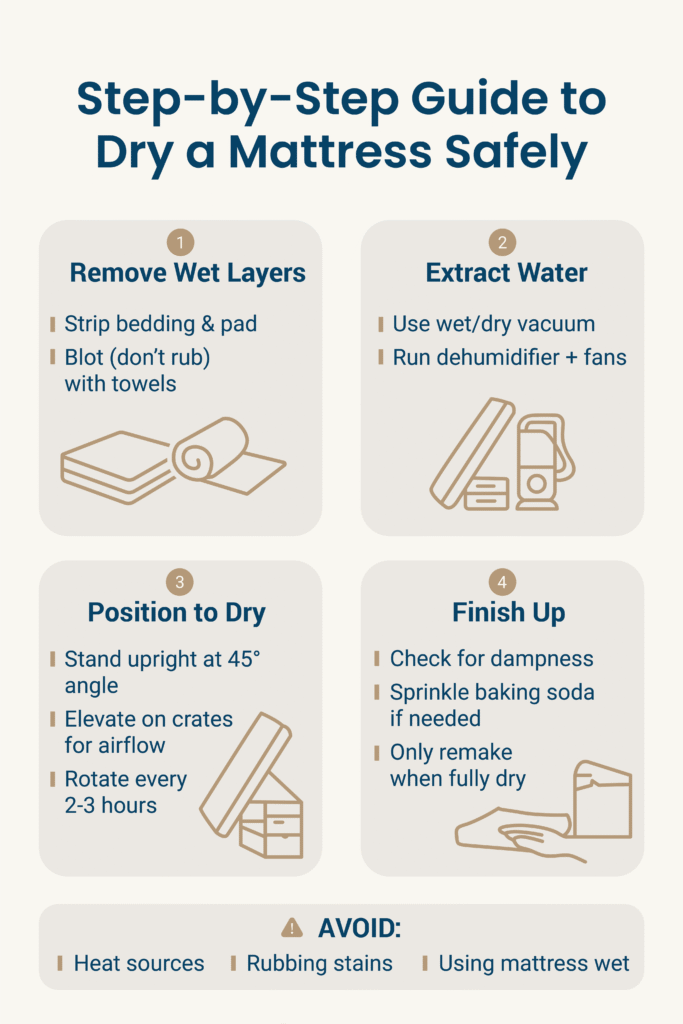
Strip and Vacuum Before Applying Steam
Begin by removing all bedding layers—sheets, protectors, toppers—and wash them in hot water. Thoroughly vacuum the exposed mattress using slow, overlapping strokes with the upholstery attachment. Pay special attention to seams, edges, and high-contact areas where dust mites concentrate. Skipping this step leaves debris that combines with steam to create mud, embedding dirt deeper into fibers. For pet owners, use a crevice tool to extract embedded fur from seams before proceeding.
Baking Soda Treatment for Odor Elimination
Sprinkle a generous layer of baking soda across the entire mattress surface. For stubborn odors or urine stains, mist lightly with white vinegar to activate the baking soda’s odor-neutralizing properties. Let the mixture sit for at least one hour (up to 24 hours for severe urine odors), then vacuum completely before steam cleaning. This pre-treatment absorbs oils and moisture while neutralizing odors at the source rather than masking them.
Proper Steam Cleaning Technique: Distance, Speed and Coverage Tips
Correct Steamer Position and Movement
Hold the steam cleaner head 2-6 inches above the mattress surface—closer risks over-wetting while farther reduces effectiveness. Start at the top left corner and work methodically across the mattress with slow, overlapping strokes. Never pause in one spot for more than 3-5 seconds, as this saturates the area and risks damage. The surface should appear damp but never wet—visible pooling indicates you’re applying too much steam. For double-sided mattresses, flip and repeat the process on the underside.
Critical Focus Areas for Maximum Results
Concentrate extra attention on seams, tufting, and edges where dust mites and bed bugs hide. These areas require slightly longer steam exposure (5-7 seconds per spot) to ensure heat penetrates crevices. For suspected bed bug activity, steam must reach at least 120°F to kill pests on contact—verify your machine maintains proper temperature throughout the process. Memory foam and latex mattresses cannot withstand this treatment; skip steam cleaning if you own these types.
Prevent Mold: How Long Your Mattress Needs to Dry After Steam Cleaning
Drying Time Requirements by Mattress Type
Allow minimum 4-6 hours drying time before remaking your bed—less time risks mold growth from trapped moisture. Double-sided innerspring mattresses typically dry faster than hybrids due to better airflow. Place dry towels on the surface to absorb excess moisture, replacing them as they become damp. Position fans to circulate air across the entire mattress surface and open windows for cross-ventilation. When possible, move the mattress outside in direct sunlight (with a protective tarp underneath) for fastest results.
Paper Towel Test for Complete Dryness
Before adding bedding, press a dry paper towel firmly against multiple areas of the mattress. If any moisture transfers to the towel, continue drying. Never sleep on a damp mattress—this creates ideal conditions for mold and mildew that compromise both your health and mattress integrity. Patience during drying protects your investment and ensures the cleaning effort delivers lasting results.
DIY vs Professional Mattress Steam Cleaning: Cost, Time and Effectiveness
When to Handle It Yourself
DIY steam cleaning costs $30-$50 for equipment rental and works well for routine maintenance on standard innerspring or hybrid mattresses. This approach suits households without severe allergy concerns who need flexible scheduling. Success depends on using proper equipment that maintains 212°F+ temperatures and following correct techniques for steam application and drying. Rent commercial-grade machines from equipment stores rather than relying on consumer carpet cleaners that often lack sufficient heat output.
When to Call Professionals ($80-$200)
Professional services become worthwhile for:
– Households with severe allergies or asthma requiring deep allergen removal
– Pet owners dealing with accidents or persistent odors
– Suspected bed bug infestations needing thorough heat treatment
– Memory foam mattresses (professionals use alternative methods)
– Severe staining that DIY methods can’t resolve
Truck-mounted commercial equipment extracts more moisture and maintains higher temperatures than rental units, resulting in better sanitization and faster drying times (typically 5-8 hours).
Memory Foam Warning: Which Mattresses Can’t Handle Steam Cleaning
Safe vs Unsafe Mattress Types
✅ Safe for Steam Cleaning:
– Innerspring mattresses
– Hybrid mattresses with pocketed coils
– Traditional spring mattresses
– Mattresses with cotton or rayon covers
❌ Never Steam Clean:
– Memory foam mattresses (heat breaks down foam structure)
– Latex mattresses (moisture becomes trapped causing mold)
– Mattresses with cooling gels or phase-change materials
– Mattresses with waterproof or specialty covers (check manufacturer instructions)
Always consult your mattress warranty before steam cleaning—many memory foam warranties void if exposed to moisture. When in doubt, contact the manufacturer directly rather than risking damage.
5 Costly Mistakes That Damage Mattresses During Steam Cleaning
Over-Wetting Creates Mold Havens
Holding the steamer too close or lingering too long saturates the mattress, creating ideal conditions for mold growth. Maintain proper distance (2-6 inches) and keep the steamer moving at consistent speed. If you notice pooling water, immediately stop and blot excess moisture with dry towels.
Skipping Pre-Vacuuming Embeds Dirt Deeper
Loose debris combines with steam to form mud that penetrates deeper into fibers. Always vacuum thoroughly before steaming, especially in seams and crevices where dust mites concentrate.
Using Inadequate Equipment Wastes Time
Household carpet steamers rarely reach the 212°F minimum needed for effective sanitization. Rent commercial-grade equipment or hire professionals for proper results.
Rushing the Drying Process Causes Secondary Damage
Placing bedding on a damp mattress traps moisture inside, leading to musty odors and potential mold growth. Always verify complete dryness with the paper towel test before remaking your bed.
Ignoring Manufacturer Instructions Voids Warranties
Memory foam and latex mattresses require alternative cleaning methods. Check your warranty documentation before applying any moisture-based cleaning technique.
Urine Stain Emergency: Steam Cleaning Solutions for Mattress Accidents
Immediate Response Protocol
Blot fresh urine immediately with absorbent cloths—never rub, as this pushes liquid deeper. Apply a mixture of hydrogen peroxide, baking soda, and dish soap to break down odor-causing compounds. Let it bubble for 15 minutes, then blot with a damp cloth. Only after this pretreatment should you steam clean the area to sanitize and lift residual stains.
For Set-In Urine Odors
Apply baking soda mixed with essential oils and let sit for 24 hours before vacuuming. Repeat the pretreatment and steam cleaning process if odors persist. Severe cases may require professional enzymatic treatment to break down crystallized urine compounds that standard cleaning can’t reach.
Mattress Protection System: Keep Your Bed Fresh Between Cleanings
Essential Maintenance Habits
Install a waterproof mattress protector to shield against spills and body oils—wash it monthly. Vacuum your mattress surface every 4-6 weeks to remove surface debris before it penetrates deep into fibers. Wash all bedding weekly in hot water to prevent allergen accumulation. Rotate your mattress quarterly to promote even wear and extend its lifespan.
Optimal Cleaning Schedule by Household Type
- Standard households: Steam clean every 6 months
- Allergy/asthma sufferers: Clean every 3 months
- Pet owners: Clean every 3 months
- Households with young children: Clean immediately after accidents
By following these evidence-based steam cleaning techniques, you’ll transform your mattress into a genuinely clean, hygienic sleep surface that supports better health and longer mattress life. Remember that proper drying time and equipment selection make the difference between successful cleaning and costly damage—patience and preparation deliver the best results for your critical sleep environment.


