

Many people wonder how to sleep on the floor without a mattress after hearing about potential benefits like improved spinal alignment, reduced back pain, or a minimalist lifestyle. Whether you’re dealing with a broken bed, trying traditional Japanese sleeping methods, or seeking relief from chronic pain, sleeping directly on the floor requires specific techniques to avoid waking up sore and stiff. The right approach transforms what might seem uncomfortable into a surprisingly restful experience that many find superior to traditional mattress sleeping.
Floor sleeping isn’t as simple as laying down on bare wood or tile—it demands strategic preparation to protect your pressure points while maintaining proper spinal alignment. Without the cushioning of a mattress, your body needs targeted support exactly where bony prominences meet the hard surface. This guide reveals exactly how to sleep on the floor without a mattress while staying warm, comfortable, and properly aligned through the night. You’ll learn material choices that prevent coldness, positioning techniques that eliminate morning stiffness, and gradual transition methods that make the shift pain-free.
Select Your Floor Sleeping Surface Strategically
Your choice of sleeping surface directly impacts comfort and spinal health when sleeping on the floor. Avoid using just a single blanket or towel, as these provide inadequate cushioning and insulation. Instead, opt for materials specifically designed to balance firm support with strategic cushioning.
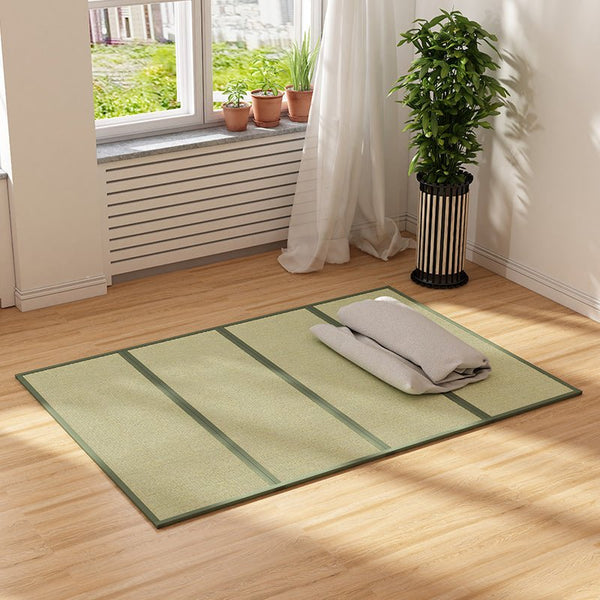
Tatami mats offer the ideal traditional solution with their 1.5-2 inch thickness of compressed rice straw wrapped in woven rush grass. These mats provide enough give to protect hip bones and shoulder joints while maintaining the firm support that promotes proper spinal alignment. Their natural materials also wick moisture and resist odors, keeping your sleeping area fresh. For best results, place two tatami mats side by side to create a full sleeping surface that prevents rolling off during the night.
Futons designed for floor use provide excellent cushioning without compromising support. Look for traditional Japanese-style futons that are 3-5 inches thick when uncompressed—they’re specifically engineered for floor sleeping. Unlike Western mattresses that encourage sinking, these futons compress just enough to protect pressure points while keeping your spine in its natural alignment. When selecting a futon, test it by lying down to ensure it doesn’t create indentations that would misalign your spine.
Yoga mats combined with camping pads create a budget-friendly floor sleeping setup. Use two yoga mats layered with a closed-cell foam camping pad for insulation against cold floors. This combination provides approximately 1 inch of cushioning—enough for back sleepers and those testing floor sleeping temporarily. For side sleepers, add an extra yoga mat under your hip area to prevent pressure point pain that commonly occurs during initial floor sleeping attempts.
Position Your Body for Pain-Free Rest

Proper body alignment makes the difference between waking up refreshed and waking up stiff when sleeping on the floor. Your goal is to maintain the spine’s natural curves without allowing any part to sink unnaturally into your sleeping surface.
Back sleepers need knee elevation to preserve lower back curvature. Place a thin pillow or folded blanket under your knees to reduce tension in your hip flexors and prevent your lumbar spine from flattening against the floor. Your head should rest on a pillow no thicker than 2-3 inches—enough to keep your neck in line with your spine but not so high that it forces your chin toward your chest. Warning: Using too thick a pillow when back sleeping on the floor creates neck strain that worsens through the night.
Side sleepers require strategic padding at hip and shoulder points. Position a firm pillow between your knees to keep your hips stacked vertically and reduce lower back strain. Your head pillow should fill the space between your shoulder and ear—typically 4-5 inches for most adults—to prevent neck twisting. For additional support, place a small rolled towel along your spine to maintain its natural curve without creating pressure points.
Stomach sleeping is strongly discouraged on hard surfaces as it forces extreme neck rotation and creates excessive lower back arching. If you’re a habitual stomach sleeper, gradually transition to side sleeping by placing a body pillow against your front to discourage rolling onto your stomach during the night. This adjustment period typically takes 1-2 weeks but prevents chronic neck and back pain associated with stomach sleeping on hard surfaces.
Stay Warm Throughout the Night
Floor sleeping presents unique temperature challenges since hard surfaces conduct heat away from your body 20 times faster than air. Without proper insulation, you’ll likely wake up chilled even in moderately cool rooms.
Create a thermal barrier between your body and the floor using reflective materials. Place a space blanket (the lightweight metallic emergency type) beneath your bottom sheet to reflect body heat back toward you. Alternatively, use wool blankets as your base layer—wool’s natural crimp traps air while wicking moisture, providing insulation that works even when damp. This layer makes a dramatic difference in comfort, especially on concrete or tile floors.
Layer your bedding strategically for temperature regulation throughout the night. Start with a cotton sheet directly against your skin, add one medium-weight blanket, and finish with a heavier comforter. This system allows you to kick off layers if you overheat—a common occurrence as your body temperature naturally drops during sleep—while keeping warmth immediately available. Most floor sleepers find they need one additional blanket layer compared to their traditional bed setup.
Pre-warm key areas before settling in for the night. Place a hot water bottle at the foot of your sleeping area for 10-15 minutes before bed—warming your feet triggers your body’s natural thermoregulation and helps you fall asleep faster. Wear warm socks to bed, as cold feet significantly disrupt sleep for many people. If using electric heating pads, warm the sleeping area first but never leave them unattended or use while sleeping due to fire risk.
Transition Gradually to Floor Sleeping

Rushing into full-time floor sleeping often leads to discomfort that discourages continued practice. A thoughtful transition period sets you up for long-term success by allowing your body to adapt gradually.
Begin with short sessions rather than attempting full nights immediately. Start by napping on your floor setup for 30-60 minutes during the day, paying attention to how your body responds. Notice which positions feel natural and where you experience pressure points. After several successful naps, extend your floor sleeping to include part of your nighttime sleep—perhaps the first few hours before moving to your bed, or the last few hours as you wake.
Track your progress with a simple sleep journal noting:
– Which surface materials you used
– Pillow configuration details
– How you felt upon waking
– Any middle-of-night position changes
– Temperature comfort level
Patterns in this data reveal what your body needs for optimal comfort. Most people require 1-4 weeks to fully adjust, with initial nights featuring some discomfort that gradually diminishes as ligaments and tendons adapt to the new support dynamics.
Troubleshoot Common Floor Sleeping Challenges
Even with proper setup, floor sleeping presents unique challenges that require specific solutions. Addressing these proactively prevents discouragement during the adjustment period.
Combat hard surface pressure points by adding targeted cushioning exactly where needed—not across your entire surface. Use a small foam pad under your hip bones if side sleeping, or a rolled towel along your spine for back sleeping. The goal is protecting vulnerable areas while maintaining the firm support that makes floor sleeping beneficial for spinal alignment.
Address mobility concerns by positioning your sleeping area against a wall or near sturdy furniture you can use for support when standing. Practice getting up from your floor sleeping position during the day to build necessary strength and coordination. If you have significant mobility limitations, consult your healthcare provider before attempting floor sleeping.
Reduce dust exposure by cleaning your sleeping area thoroughly before setup. Vacuum or sweep the floor beneath your sleeping surface daily, launder bedding frequently, and consider an air purifier if allergies are a concern. Natural materials like tatami require specific cleaning approaches, so research care instructions before purchase.
Know When Floor Sleeping Isn’t Right for You
While floor sleeping benefits many people, it isn’t universally appropriate. Consult your healthcare provider before switching if you have:
- Existing spinal conditions like herniated discs or severe spinal stenosis
- Circulation issues such as peripheral neuropathy
- Severe arthritis or other joint conditions
- Chronic pain syndromes like fibromyalgia
If you experience sharp pain, numbness, or tingling during floor sleeping attempts, discontinue immediately and consult a professional. The goal is better sleep—not floor sleeping specifically—and sometimes traditional bedding better serves individual health needs.
Learning how to sleep on the floor without a mattress successfully requires understanding that it’s not simply about removing your mattress—it’s about creating a strategic sleeping environment that supports your body’s natural alignment. Start with quality materials that balance cushioning and support, transition gradually while listening to your body’s feedback, and address temperature concerns proactively. For most people willing to navigate the 1-4 week adjustment period, floor sleeping evolves from an uncomfortable novelty to a preferred sleep method that delivers noticeably better rest and reduced morning stiffness. Pro tip: Keep your setup simple and consistent—complicated arrangements that change nightly prevent your body from adapting properly. If after a month of careful implementation you still experience discomfort, your body may simply prefer traditional bedding, and that’s perfectly okay. The ultimate goal remains restful, restorative sleep, whatever surface helps you achieve it.


