

Struggling to maneuver your bulky mattress through narrow doorways or cram it into an overstuffed moving truck? If you’re wondering how to shrink mattress for moving without damaging your investment, you’ve come to the right place. Most memory foam and all-foam mattresses can be safely compressed to roughly one-third of their original size using proper techniques, transforming what was once a moving nightmare into a manageable task. This space-saving method not only simplifies transportation but also shields your mattress from dirt, moisture, and physical damage during the chaotic moving process.
By the time you finish reading this guide, you’ll know exactly which mattresses can be compressed safely, the precise tools you’ll need, step-by-step compression instructions, critical safety precautions to prevent permanent damage, and what to do once you reach your new home. Whether you’re moving across town or across the country, mastering how to shrink mattress for moving will save you time, money, and physical strain while ensuring your mattress arrives in perfect condition.
Why Compress Your Mattress for Moving
Shrinking your mattress before relocation offers compelling advantages that make the extra effort worthwhile for compatible mattress types. When you successfully compress your mattress, you’ll immediately notice how much easier it is to handle—what once required four strong people to carry through doorways can now be managed by two with the help of strategically placed ratchet straps. The dramatic space reduction means your mattress takes up only about one-third of its original volume, freeing up valuable room in your moving vehicle for other belongings.
Beyond the obvious space savings, compression provides superior protection during transit. The sealed plastic barrier surrounding your compressed mattress shields it from common moving hazards like dust, moisture, pests, and accidental tears. Unlike simple shrink wrapping that only covers the surface, proper vacuum compression creates a complete environmental seal that keeps your mattress clean and dry even if your moving day turns unexpectedly rainy or your truck gets delayed.
The financial benefits often surprise first-time movers who learn how to shrink mattress for moving. Many discover they can fit everything in a smaller truck rental or make fewer trips when their mattress no longer dominates the available space. For those hiring professional movers, a compressed mattress might drop your move into a lower price tier, potentially saving hundreds of dollars on moving costs while reducing the physical strain on your back and shoulders during loading and unloading.
Mattress Types That Compress Safely
Not all mattresses can withstand the compression process, and attempting to shrink the wrong type will permanently damage your investment. Memory foam and all-foam mattresses compress most successfully because they contain no rigid internal structures—these flexible foam layers return to their original shape once the compression pressure releases. If your mattress came in a box from an online retailer, it was specifically designed to handle compression, making it an ideal candidate for this moving technique.
Hybrid mattresses present a more complicated scenario. While these combine foam layers with a smaller number of metal coils, some models can be compressed safely if you follow the manufacturer’s specific guidelines. Always check your warranty documentation before attempting to shrink a hybrid mattress, as improper compression could bend the coils and create uncomfortable pressure points that ruin your sleep surface.
Traditional innerspring mattresses should never be compressed at home under any circumstances. The extensive metal coil system that forms their support structure cannot withstand vacuum compression pressure—attempting to shrink this type will almost certainly bend or break the coils, creating permanent damage that makes the mattress uncomfortable or unusable. If you have an innerspring mattress, you’ll need alternative moving solutions rather than learning how to shrink mattress for moving.
Essential Tools for Successful Mattress Compression

Gathering the right equipment before you begin ensures your mattress compression process goes smoothly without frustrating interruptions. Heavy-duty mattress compression bags specifically designed for this purpose form the foundation of your shrinking system—choose the correct size for your mattress (twin, full, queen, or king) and ensure they’re at least 4 mil thick to prevent tears during compression.
Your vacuum cleaner provides the necessary suction to remove air from the sealed bag, causing your mattress to shrink significantly. Standard household vacuums work for most standard mattresses, but for thicker or denser models, a shop vacuum delivers stronger suction that achieves better compression results. One-way vacuum valves connect your vacuum to the sealed bag and prevent air from flowing back in after you remove the hose—these inexpensive accessories are essential for maintaining compression.
Ratchet straps serve multiple critical functions—they maintain compression after the vacuum process completes and provide convenient carrying handles. Use at least two straps (one near the head and one near the foot), with a third strap in the middle for larger queen and king mattresses. Strong duct tape or packing tape creates airtight seals around the bag opening and valve connection, preventing air leaks that would compromise your compression efforts.
Prepare Your Mattress Before Compression
Proper preparation significantly increases your success rate when learning how to shrink mattress for moving. Start by stripping your mattress completely of all sheets, mattress pads, and protectors—you’ll wash and pack these separately, as they shouldn’t be compressed with your mattress. If you use a thin waterproof mattress protector, you can leave it on during compression as it won’t create problematic bumps.
Place your bare mattress on a clean, flat surface like your floor before beginning the compression process. Ensure the surface is completely level and free of any objects that could puncture the plastic bag—this is especially important if you’re working on carpet, where debris might be hidden underneath. Thoroughly inspect every inch of your mattress for existing damage before proceeding, as small tears or weak seams will likely expand under compression pressure.
Clear the surrounding area of any objects that might interfere with the compression process or accidentally tear the plastic bag. Having adequate space to work makes the entire process smoother and dramatically reduces the risk of accidental damage to your mattress during this critical preparation phase.
Vacuum Compression Method: Step-by-Step
The vacuum compression method delivers the most significant size reduction when you need to shrink mattress for moving. Carefully slide your mattress into the compression bag, taking special care not to tear the plastic material—ask for help with larger mattresses rather than forcing them, which could damage both the mattress and the bag.
Push out as much air as possible by hand before sealing the bag, which makes the vacuum process more efficient. Fold the open end of the bag several times, then secure it with overlapping strips of duct tape, running your hand along the sealed edge to check for any gaps. Select a flat spot on the mattress bag away from edges and seams for the valve placement, cutting a small hole exactly the size of your valve’s inner piece.
Connect your vacuum hose securely to the valve and turn it on, watching as your mattress begins to flatten and compress. Continue the vacuum process until no more air comes out and your mattress has compressed to about one-third of its original thickness—this typically takes 10-15 minutes for a standard mattress. Once fully compressed, quickly remove the vacuum hose and seal the valve immediately to prevent air from re-entering the bag.
Seal and Protect Your Compressed Mattress
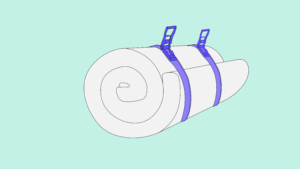
After achieving compression, properly securing your mattress ensures it maintains its reduced size during transport. Wrap ratchet straps around the compressed mattress while it remains flat on the floor, positioning at least two straps—one near the head and one near the foot—and tighten them gradually to maintain even pressure across the entire surface.
The straps serve dual purposes: they keep your mattress compressed and provide convenient handles for carrying during your move. Tighten straps enough to maintain compression but avoid over-tightening, which could damage the foam or tear the plastic bag. Inspect the entire compressed package for any areas where the plastic bag might have weakened during compression and reinforce questionable areas with additional tape.
If you’ll be moving in rainy conditions or storing your compressed mattress for any period, consider adding an extra layer of plastic sheeting around the entire package. This simple step provides additional moisture protection and prevents water damage if the compressed mattress gets exposed to rain during loading or unloading.
Critical Safety Guidelines to Follow
Always compress your mattress while it lies completely flat on a stable, level surface—compressing in any other position creates uneven pressure that can damage the internal foam structure. Never stand your mattress against a wall during compression, as this creates permanent creases where the mattress bends under its own weight. Some movers place a large piece of plywood under the mattress during compression to ensure a perfectly flat surface that won’t bow.
Most memory foam mattresses should remain compressed for no longer than two weeks to avoid permanent damage to the foam cells. The longer your mattress stays compressed, especially in extreme temperatures, the higher the risk it won’t fully expand when unpacked. Never fold your mattress in half before or after compression, as this creates a sharp crease that may become permanent. If you must bend your compressed mattress to fit through tight spaces, create the gentlest curve possible rather than a sharp angle.
Proper Decompression After Moving
Once you’ve reached your new home, properly decompressing your mattress ensures it returns to its original shape. Cut the ratchet straps carefully with scissors, making sure not to damage the mattress underneath. Open the plastic bag by cutting along one edge, away from the mattress surface to avoid accidental cuts to the fabric cover.
Place your unwrapped mattress on a flat surface and leave it undisturbed—most memory foam mattresses need at least 24 hours to regain 90% of their original shape, with thicker models often requiring the full 72 hours. Avoid sleeping on your mattress during this initial expansion period, as this can create permanent body impressions. Keep your room at a comfortable temperature between 68-72°F to help the foam expand properly.
When to Skip Mattress Compression
Traditional innerspring mattresses should never be compressed at home regardless of circumstances—the metal coils will permanently bend or break. Mattresses older than seven years have usually begun breaking down internally, making them poor candidates for compression. Check your mattress warranty before compressing, as many specifically prohibit compression by anyone other than the manufacturer.
Mattresses with existing visible damage—including tears, sagging areas, or body impressions—should not be compressed. Existing damage will almost certainly expand during compression, potentially destroying the mattress completely. These mattresses have already begun failing and compression will accelerate that failure.
Alternative Moving Solutions
When compression isn’t suitable for your mattress, professional moving companies offer specialized equipment and techniques for safe transportation. Most movers use thick mattress bags and protective corrugated cardboard covers to shield your mattress from damage during transit. Mattress carrying bags with sturdy handles provide an excellent DIY alternative, making moving an uncompressed mattress much easier with reinforced corners that prevent tears.
Sometimes replacing your mattress makes more practical sense than moving it, especially if it’s approaching the end of its useful life. Many online mattress companies deliver compressed new mattresses directly to your new home, eliminating moving concerns entirely. Some even offer old mattress removal with new delivery, solving two problems simultaneously.
Final Thoughts
Successfully shrinking a mattress for moving requires careful planning, the right tools, and strict attention to safety guidelines throughout the process. When done properly on the appropriate mattress type, compression can save significant space and make your move much more manageable while also protecting your mattress from dirt and damage during transport. Always verify your mattress type and condition before attempting compression, since not all mattresses can safely handle this process. With the knowledge from this guide, you can confidently make the best decision for your specific moving situation, ensuring your mattress arrives at your new home ready for years of comfortable sleep.


