Your Air Dream mattress suddenly deflates overnight, leaving you sleeping on a partially inflated surface that offers little comfort. This frustrating scenario affects countless RV and sofa sleeper owners who rely on Air Dream mattresses from manufacturers like Flexsteel, Lambright, Villa, and Comfort Fit. When your mattress won’t hold air through the night, the culprit is often a worn-out valve rather than a damaged air bladder. Replacing the Air Dream mattress valve costs just $15.99 compared to hundreds for a new mattress, making it the smart first repair attempt. This complete guide shows you exactly how to replace your Air Dream mattress valve in under an hour using simple tools you likely already own, restoring your mattress to full functionality without breaking the bank.
Why Your Air Dream Mattress Valve Fails and Needs Replacement
Most Air Dream mattress deflation issues stem from valve failure rather than bladder damage, especially in mattresses over two years old. The valve’s rubber sealing elements deteriorate over time, losing their ability to create an airtight seal. You’ll notice symptoms like your mattress deflating completely overnight despite the valve appearing closed, air escaping immediately after inflation stops, or the valve feeling loose and wobbly when manipulated. Visible cracks, warping, or deterioration around the valve components confirm it’s time for replacement.
Before replacing the valve, rule out other causes by performing a simple soapy water test. Mix water and dish soap, then apply it around the valve area while the mattress is inflated. Bubbles indicate escaping air and confirm a seal failure. Check for debris in the valve opening that might prevent proper sealing, and examine visible portions of the air bladder for punctures. If the valve itself shows damage or feels compromised, replacement is your most cost-effective solution.
Essential Tools for Air Dream Valve Replacement Success

Gather these specific tools before starting to avoid interruptions during your repair:
- Hair dryer (critical for softening vinyl material)
- Quarter or small flat object (for valve manipulation)
- Clean cloths (to wipe the work area)
- Well-lit workspace (to see valve components clearly)
Environmental conditions significantly impact your success. Perform this repair in a warm room or during warm weather, as cooler temperatures make vinyl stiffer and harder to manipulate. Lay your mattress on a clean, flat surface that provides stability during the process. The hair dryer is non-negotiable for success—many customers report that heating the vinyl transforms a frustrating struggle into a manageable repair. Keep it at a safe distance of six to eight inches to avoid scorching the material while warming the vinyl for thirty seconds to one minute until pliable.
How to Properly Deflate and Access Your Air Dream Valve
Begin by fully deflating your mattress—lift the valve tab to release all air and wait until completely flat. Working with a partially inflated mattress keeps the vinyl taut and difficult to manipulate, making valve removal nearly impossible. Complete deflation creates the slack needed in the vinyl material for both removal and installation.
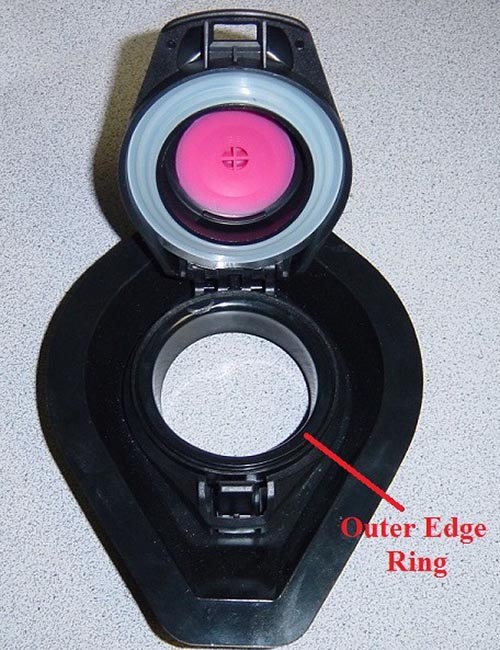
Locate the valve assembly and identify its components before proceeding. The valve consists of a central air passage mechanism surrounded by a black plastic outer edge ring that secures it to the mattress. Note the hinge area on one side that must align with the mattress’s hinge support during installation. Understanding these components prevents installation errors that cause future leakage issues.
Step-by-Step Air Dream Valve Removal Process
Start by heating the vinyl surrounding the valve with your hair dryer for thirty seconds until noticeably more pliable. Push the black plastic outer edge ring toward the center of the valve opening using your quarter—apply steady, firm pressure to gradually work the ring inward. This creates clearance to lift the old valve off over the outer edge ring.
Continue pushing and lifting motions while periodically reheating the vinyl as needed. The heated material becomes dramatically easier to manipulate, reducing the risk of tearing. Work patiently until the old valve separates completely from the mattress opening. Set the old valve aside for disposal and prepare your replacement valve (model 102*600800) for installation.
How to Install Your New Air Dream Replacement Valve
Inspect your new valve before installation—open and close the mechanism to verify smooth operation. Locate the hinge area that must align with the mattress’s hinge support and the outer edge ring that will secure the valve in place.
Begin by seating the valve’s hinge area onto the mattress’s hinge support to establish correct orientation. With the hinge properly seated, feed the outer edge ring through the valve opening, pushing the black plastic toward the center as needed. Apply heat with your hair dryer to keep the vinyl flexible during this process.
Continue feeding the vinyl through until you feel or hear a distinct locking sensation as the components seat properly. Use your thumb to check for bulges in the surrounding vinyl, smoothing them gently to ensure a flush, even installation. Lock the replacement valve shut and inspect the installation area to confirm the valve sits flush with no bunching or gaps.
Testing Your Newly Installed Air Dream Valve
After installation, verify proper function before returning your mattress to regular use. Close the valve securely and attach your pump to inflate the mattress, watching carefully for air escaping around the valve area. Inflate fully and allow it to sit for several hours, checking periodically for deflation.
Listen for hissing sounds and feel around the valve for air movement that indicates leakage. If you notice leakage, the valve may not be fully seated—deflate the mattress and revisit the installation steps. Perform the soapy water test again around the valve to pinpoint exactly where air might be escaping. Proper function means your mattress holds air reliably with no audible or detectable leakage from the valve assembly.
Pro Tips for Air Dream Valve Replacement Success
Experienced DIYers consistently emphasize these critical techniques:
- Heat strategically: Apply the hair dryer in thirty-second intervals to soften vinyl before each manipulation step
- Work gently: Squeeze vinyl toward the center of the mattress opening rather than forcing it through
- Check alignment: Ensure the hinge aligns perfectly with the mattress support before feeding the valve
- Smooth thoroughly: After installation, check for bulges and smooth from center outward to prevent stress points
One customer reported that heating the vinyl “transformed a frustrating, difficult process into a relatively straightforward repair that took only minutes to complete.” Another noted that “gentle persistence outperforms forceful pressure every time” when working with the vinyl material.
Troubleshooting Common Air Dream Valve Installation Issues
If your new valve won’t seat properly, first verify correct hinge alignment with the mattress support—an incorrect orientation prevents proper installation. Check that you’re not installing the valve upside down or rotated incorrectly. If alignment appears correct but the valve still won’t lock, apply additional heat to make the vinyl flexible enough to work over the outer edge ring.
Continued leakage after installation typically indicates incomplete seating or damaged surrounding vinyl. Deflate the mattress and re-examine the installation, ensuring the outer edge ring is fully locked and the vinyl is smooth without bunching. Apply the soapy water test to pinpoint the exact leakage location—if bubbles appear around the valve perimeter, the seal isn’t complete; if bubbles emerge from the valve mechanism itself, the replacement part may be defective.
Air Dream Valve Compatibility and Alternative Solutions
The replacement valve works specifically with Air Dream mattresses using external pump systems from Flexsteel, Lambright, Villa, and Comfort Fit. It’s also compatible with similar air bladders in Intex and other manufacturer’s RV and marine furniture applications. Before purchasing, verify your mattress uses an external pump configuration—the valve won’t work with mattresses featuring integrated pumps.
For broader system issues, consider these related products:
– Air Dream replacement inflator ($85.89) for pump failures
– Queen-size air chamber replacement ($228.00) for bladder damage
– Five-piece valve lid kit ($7.98) for minor sealing issues
Extending Your Air Dream Mattress Lifespan After Valve Replacement
Protect your investment with these maintenance practices:
- Limit usage: Reserve Air Dream mattresses for occasional guest use rather than everyday sleeping
- Regular inspections: Check valve and surrounding vinyl each time you use the mattress
- Proper storage: Store completely deflated in a climate-controlled environment away from sunlight
- Exercise the valve: Periodically open and close the valve mechanism to prevent sealing elements from stiffening
Following these practices with your newly installed valve extends your mattress lifespan significantly—customers report successfully using replacement valves on twenty-year-old Aerobeds. The $15.99 valve replacement represents substantial savings compared to full mattress replacement, making it the economical first approach for most deflation issues.
By following this precise process, you’ll restore your Air Dream mattress to full functionality in under an hour, avoiding the expense of complete replacement while gaining the satisfaction of a successful DIY repair. With proper care, your newly installed valve will provide years of reliable service, ensuring restful nights for your guests without unexpected deflation.