
That annoying space between your mattress and headboard isn’t just unsightly—it’s a dust magnet that collects everything from hair ties to TV remotes while allowing your mattress to shift all night. If you’ve ever woken up with your pillow halfway behind the bed or struggled to keep your sheets in place because of this gap, you’re not alone. The good news is that learning how to fix gap between mattress and headboard is simpler than most homeowners realize, requiring minimal tools and typically taking less than 30 minutes to complete. Whether your gap developed gradually as your mattress settled or appeared suddenly after rearranging your bedroom, this guide provides proven solutions that work for all bed sizes and styles—so you can finally reclaim a clean, stable sleeping surface without calling a professional or breaking the bank.
Diagnose Your Mattress-Headboard Gap Cause

Fixing a gap between your mattress and headboard starts with identifying why it formed in the first place. Jumping straight to solutions without understanding the root cause often leads to temporary fixes that fail within weeks.
Check for Loose Frame Connections
Begin by inspecting all hardware where your headboard attaches to the bed frame. Most standard bed frames use bolt-through connections, cam-lock mechanisms, or bracket systems that can loosen over time from regular movement. Stand at the foot of your bed and push firmly against the headboard—any noticeable wobble or movement indicates loose hardware. Pay special attention to the lower attachment points, as these bear the most stress during normal use. Warning: Don’t overtighten stripped bolts, as this can worsen the problem—mark any stripped connections for replacement hardware.
Measure Gap Dimensions Precisely
Not all gaps require the same solution, so grab your tape measure and document exactly what you’re dealing with. Measure the gap width at three points: top, middle, and bottom of the mattress height. Note whether the gap is consistent or varies in size—this affects which filler products will work best. Also measure the gap depth from the mattress surface to the headboard. Most standard gap fillers accommodate spaces between 0.5-4 inches wide, so knowing your exact measurements prevents buying the wrong solution.
Determine Mattress Settling Impact
New mattresses, especially memory foam or hybrid models, typically lose 1-2 inches of height during their first 3-6 months as materials compress. If your bed is relatively new and the gap developed gradually, mattress settling is likely the culprit. This type of gap often stabilizes on its own after the break-in period, but you’ll still need a temporary solution to maintain comfort and prevent debris accumulation during this time.
Select the Most Effective Gap Filler Solution
With your gap cause identified, choose a solution that addresses both the symptom and underlying issue for lasting results.
Pick the Right Filler Size for Your Gap
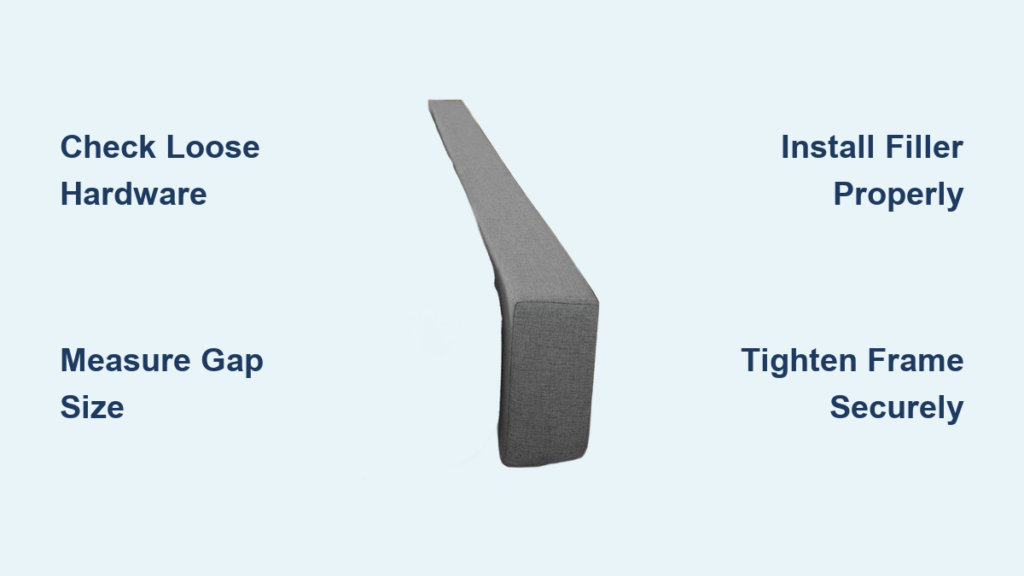
Mattress gap fillers come in various widths designed to accommodate different gap sizes. The LGFV Mattress Gap Filler works for most standard gaps between 0.5-4 inches wide—simply choose the size that matches your widest measurement point. Pro Tip: When in doubt between sizes, opt for the larger option since flexible fillers can compress to fit smaller spaces but won’t expand beyond their maximum width.
Prioritize Flexible, Durable Materials
The best gap fillers combine closed-cell foam construction with sufficient flexibility to accommodate normal mattress movement. Rigid fillers may seem sturdy initially but often pop out of place when you shift during sleep. Look for products specifically designed with durability in mind—these maintain their shape over years of use while still adapting to your bed’s natural flex. Avoid cheap foam alternatives that compress permanently within weeks.
Coordinate Filler Color with Your Bedroom Decor
While functionality matters most, appearance shouldn’t be ignored. Gap fillers come in various colors including neutral tones, black, and white to match different bedroom styles. For traditional bedrooms, choose a filler that matches your headboard color. In modern spaces with contrasting headboards, a black or white filler often creates a deliberate design element rather than looking like a fix. Remember that most fillers sit partially hidden in the gap, so perfect color matching isn’t necessary.
Install Your Mattress Gap Filler Correctly
Proper installation makes the difference between a solution that lasts years versus one that fails within days.
Complete Tool-Free Installation in Minutes
Clear any debris from the gap first—you’ll be surprised what’s accumulated back there! Position the filler at the top of the gap where the mattress meets the headboard, then work it downward while applying firm, even pressure along its entire length. The filler should expand slightly as you release pressure, creating contact with both surfaces. For a standard queen bed, this process takes less than 5 minutes with no tools required—making it one of the quickest fixes you’ll ever implement in your home.
Verify Secure Placement Before Use
After installation, press firmly along the entire filler length to ensure complete contact with both mattress and headboard. Then test it by lying on the bed and shifting your weight—roll from side to side and sit up abruptly to simulate normal movement. A properly installed filler stays firmly seated without shifting or creating new gaps at the edges. If it moves, remove it and try compressing it slightly more during reinstallation.
Address Underlying Frame Issues First
If your headboard still wobbles after tightening hardware, the gap filler alone won’t solve your problem. In these cases, address frame stability before installing the filler—otherwise, you’re just masking an ongoing separation issue that will worsen over time. The combination of secure frame connections plus gap filler creates the most durable solution.
Tighten Bed Frame Hardware Properly
For gaps caused by loose connections, hardware adjustment provides a permanent solution when done correctly.
Identify All Connection Types on Your Frame
Bed frames use various attachment systems:
– Bolt-through connections with nuts underneath
– Cam-lock mechanisms requiring special tools
– Bracket systems that clip onto frame rails
– Slotted connections with set screws
Examine each attachment point carefully before attempting adjustments—using the wrong tool can strip connections and create more serious problems.
Tighten Hardware Using the Star Pattern Method
Tighten connections in a star pattern (opposite points first) rather than completing one side before moving to the other. This ensures even pressure distribution that prevents warping. Apply moderate force—enough to eliminate movement but not so much that you strip threads. For cam-lock systems, rotate the mechanism until you feel resistance, then give one additional quarter-turn.
Implement Long-Term Prevention Strategies
Stop future gaps before they start with these simple maintenance techniques.
Schedule Quarterly Frame Maintenance
Set a phone reminder to check bed frame hardware every 3 months. This 5-minute task prevents the gradual loosening that leads to gap formation. Focus on connection points that previously showed movement—these often loosen faster than others.
Match Mattress Height to Headboard Design
When replacing your mattress, consider how its height relates to your headboard. Mattresses that sit significantly below the headboard’s top third create leverage that encourages movement. Opt for a mattress thickness that keeps the sleeping surface within the lower portion of your headboard for optimal stability.
Achieve Permanent Gap-Free Results
Fixing a gap between mattress and headboard successfully combines immediate solutions with preventive maintenance. For most homeowners, installing a quality gap filler like the LGFV Mattress Gap Filler resolves the immediate issue, while addressing any underlying frame looseness ensures the problem doesn’t return. The entire process requires no special tools, minimal time investment, and delivers immediate improvements to both bedroom appearance and sleep quality. By implementing the diagnostic steps, proper installation techniques, and preventive measures outlined in this guide, you’ll enjoy a stable, gap-free bed setup that enhances your bedroom for years to come—without needing professional help or expensive equipment. Remember that the most effective approach to how to fix gap between mattress and headboard involves understanding your specific situation rather than applying a one-size-fits-all solution. With these proven methods, that annoying space collecting your missing TV remote will become a thing of the past.


