
That annoying crevice between your mattress and headboard swallows your pillows every night. The cold draft along your wall edge keeps you tossing and turning. The uncomfortable ridge between split mattresses on your adjustable base disrupts your sleep when you roll over. These mattress gaps aren’t just inconvenient—they’re stealing your sleep quality and comfort. The good news is that filling these gaps is simpler and more affordable than you think. With the right approach and materials, you can eliminate these sleep disruptors in minutes, transforming your bed into the comfortable retreat it should be.
This guide delivers exactly what you need to know to permanently solve mattress gaps. You’ll discover why gaps form, learn which filler materials actually work (not just temporary fixes), get precise measurement techniques, and understand installation tricks that keep fillers in place. Whether you’re dealing with headboard voids, wall gaps, or split mattress separations, this comprehensive resource gives you actionable solutions tailored to your specific situation—no more guesswork or wasted money on ineffective products.
Why Your Mattress Gap Keeps Coming Back
Mattress gaps develop from specific structural issues that most homeowners misunderstand, causing them to apply ineffective temporary fixes. Platform beds create gaps when mattress edges don’t fully contact the frame walls due to slight dimension variations between mattress and frame specifications. As your mattress ages, changing compression patterns widen these gaps, particularly along the edges where you sit to get in and out of bed.
Adjustable base setups almost always develop separation between paired split mattresses. Each time you adjust your base position, the two mattress halves shift apart, creating an increasingly uncomfortable ridge down the center that worsens with use. This problem intensifies as the mattresses permanently compress in high-flex areas, making the gap impossible to ignore.
Headboard installations leave frustrating voids between the mattress top and headboard face, especially with thinner mattresses or deeper headboards. These gaps not only swallow your pillows but also eliminate the comfortable back support you expect from your headboard. Wall-mounted beds create similar issues where the mattress can’t extend fully to the wall surface, resulting in drafts and lost bedding.
Identify Your Specific Gap Type Before Choosing a Solution
Different gap types require distinct approaches—using the wrong solution wastes time and money. Measure your gap’s location, width, depth, and whether it changes with bed movement. Headboard gaps typically run horizontally along the top mattress edge, while wall gaps appear vertically along the mattress side. Split mattress gaps form horizontally between two separate mattress halves on adjustable bases. Understanding your gap’s specific characteristics ensures you select the right filler material, size, and installation method for permanent results.
Select the Best Mattress Gap Filler for Your Situation

Memory foam fillers outperform all alternatives for most mattress gap scenarios, but not all memory foam products deliver equal results. Look for 45D high-density memory foam (measured in kilograms per cubic meter) which provides the optimal balance between structural integrity and comfortable conforming. This density specification indicates superior durability compared to standard bedding foams (typically 30-40kg/m³) while maintaining enough softness to prevent pressure points.
Choose the Right Cover Material for Your Needs
The exterior cover significantly impacts functionality and maintenance:
– Linen covers: Best for headboard gaps where your head or arms contact the filler—provides natural breathability and moisture-wicking
– Polyester waterproof covers: Essential for households with children or pets—resists spills and simplifies cleaning
– Tech cloth variants: Ideal for high-traffic applications—offers industrial-grade durability for commercial settings
Custom sizing capabilities separate quality products from improvised solutions. Premium manufacturers offer exact length and width specifications matching your unique gap dimensions. This customization proves invaluable for non-standard bed configurations including antique frames, custom platform beds, and therapeutic sleep surfaces requiring precise measurements.
Measure Your Gap for Perfect Filler Fit
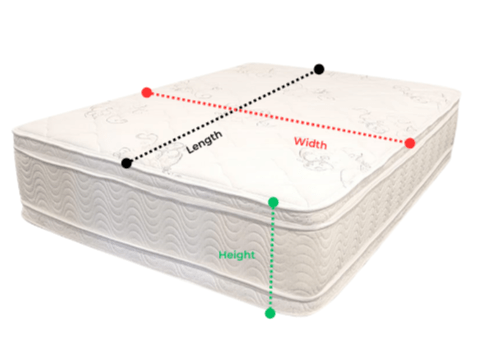
Accurate measurements prevent the frustration of buying a filler that’s too small, too large, or the wrong shape for your specific gap. For headboard gaps, measure the horizontal distance from mattress top to headboard bottom at multiple points across the width—gaps often vary due to mattress compression patterns. Record both minimum and maximum measurements to ensure complete coverage.
Wall Gap Measurement Protocol
Measure from mattress edge to wall surface at both the head and foot of your bed, accounting for any bed frame overhang that affects gap geometry. Check for variations along the entire wall edge—older homes often have uneven walls creating inconsistent gap widths. Add 5-10mm to your measurements to ensure full coverage without excessive compression that causes bulging.
For split mattress gaps on adjustable bases, measure the gap width along the entire separation line in multiple base positions. Determine if the gap exists only at the surface level or extends through the full mattress depth—this affects required filler thickness. Note the maximum gap width as your primary measurement since adjustable bases create variable separation.
Install Your Mattress Gap Filler Like a Pro
Proper placement determines whether your gap solution lasts or fails within days. For headboard gaps, position the filler so it contacts both the mattress top surface and headboard face with enough compression to prevent shifting. The top edge should align with your pillow placement to avoid creating an uncomfortable ridge. Some users find angled placement (sloping from mattress to headboard) more comfortable than vertical filling.
Secure Wall Gap Fillers Against Drafts
Slide wall gap fillers into position so they contact both mattress edge and wall surface, fitting snugly without visible bulging. In poorly insulated rooms, avoid completely sealing the gap which can cause condensation and mold—opt for breathable covers that block drafts while allowing some air circulation. Secure fillers with removable adhesive strips if your bed experiences frequent movement.
For split mattress gaps, position the filler to bridge the separation while maintaining a flat sleep surface. The top should align with or sit slightly below adjacent mattress surfaces, creating a smooth transition rather than a raised ridge. Allow vacuum-packed fillers 24-48 hours to fully expand before evaluating fit or performance.
Fix Headboard Gaps Without Compromising Comfort
Headboard gaps create unique challenges because they affect your primary sleep position and constantly swallow pillows. Memory foam fillers work exceptionally well here because they conform to irregular surfaces while providing comfortable contact when you sit up in bed. Choose linen-covered fillers for breathability if your head or arms will contact the filled space.
Optimize Headboard Filler Placement
Measure the vertical distance from mattress top to headboard front face carefully—this determines required filler thickness. For deep headboards (over 3 inches), you’ll need thicker fillers to reach from mattress surface to headboard front. Consider angled placement where the filler slopes toward the headboard, reducing visual impact while maintaining functional coverage. This configuration often feels more natural when leaning against the headboard, though it may require occasional adjustment as the foam compresses.
Solve Wall Gap Drafts and Bedding Loss
Wall gaps create drafts that disrupt sleep and swallow bedding items during the night. These gaps commonly occur with platform beds, wall-mounted beds, and any configuration where the mattress doesn’t extend fully to the wall surface.
Address Moisture Concerns in Wall Gaps
Unfilled wall gaps allow cold air circulation behind the mattress, particularly problematic in bedrooms with exterior walls. While gap fillers block drafts, completely sealing the gap can cause condensation in certain climates. If you notice moisture accumulation behind your bed, choose fillers with breathable covers that allow some air circulation while blocking direct drafts. Position the filler so it contacts both mattress edge and wall surface without creating visible bulging along the mattress side.
Eliminate Split Mattress Gaps on Adjustable Bases

Split mattress gaps create unique challenges because the separation changes as your base moves. Quality memory foam fillers maintain their shape and position even as mattresses shift during base adjustment, unlike softer alternatives that quickly migrate or dislodge.
Bridge the Gap Effectively
Position your filler so it spans the separation while maintaining a relatively flat sleep surface. The top should align with adjacent mattress surfaces to prevent the uncomfortable ridge that disrupts sleep when rolling across the gap. Measure the gap at multiple base positions to understand its full range—custom-sized fillers matching your maximum gap width provide the most reliable solution. Some users prefer slightly thicker fillers that create subtle raised support across the separation line for added stability.
DIY Mattress Gap Fillers: Temporary Fixes That Work
When commercial products aren’t immediately available, these improvised solutions provide temporary relief:
- Rolled bath towels: Instantly available but compress permanently within days—best as emergency stopgaps
- Repurposed pillows: Work for shallow gaps but lack consistent firmness and compress unevenly
- Pool noodles: Surprisingly effective for narrow gaps—cut to length and wedge into place
Commercial gap fillers outperform DIY alternatives across every performance dimension including consistency, durability, and maintenance. While rolled towels cost nothing initially, their rapid degradation may require monthly replacement in high-use applications—accumulating costs that surpass the one-time purchase of a quality commercial filler with multi-year service life.
Maintain Your Mattress Gap Fillers for Longevity
Proper maintenance extends product service life and maintains hygienic sleep conditions. Machine-washable covers should be laundered on gentle cycles using mild detergents, with air drying to prevent heat damage to foam cores. Waterproof covers typically require only surface cleaning with damp cloths and mild cleaners.
Rotate your gap filler 180 degrees monthly to redistribute compression patterns and prevent permanent flattening in frequently-contacted areas. Quality memory foam fillers typically last 3-5 years under normal household use—replace when you notice visible compression, cover damage, or persistent hygiene concerns despite cleaning.
Final Gap-Filling Checklist Before Bedtime
Before calling it a night, ensure your gap solution delivers maximum effectiveness:
– Verify filler contacts both surfaces completely without gaps at the edges
– Confirm no uncomfortable ridges interfere with sleep positions
– Check that pillows remain in place throughout the night
– Ensure no drafts penetrate through or around the filler
– Confirm the filler stays securely positioned after base adjustments
Investing in the right gap filler for your specific situation pays immediate dividends in improved sleep quality. Quality memory foam products in the $15-20 range provide multi-year service life that outperforms cheaper alternatives, transforming that troublesome gap into comfortable, seamless sleep surface. Your bed should be a comfortable retreat, not a source of constant adjustment—address those gaps today and reclaim your sleep space.


