
Moving a mattress without proper protection is like sending your favorite book through the mail without a box—it might survive, but the risks aren’t worth taking. A mattress bag creates an essential shield against dirt, moisture, dust mites, and physical damage during transit or storage. Whether you’re relocating across town or storing your mattress for seasonal use, knowing how to properly use a mattress bag prevents costly damage and preserves your sleep investment. This guide shows you exactly how to select, prepare, seal, and store your mattress using professional techniques that movers rely on, so you can ensure your mattress stays clean, dry, and ready for use when you need it again.
Why Your Mattress Needs Proper Bagging Protection
Mattresses face multiple threats during moves that most homeowners overlook until it’s too late. When transported unprotected, your mattress collects dust from moving trucks, absorbs moisture from humid air, and risks punctures from rough handling. Dust mites thrive in these conditions, multiplying rapidly in the dark, enclosed space of a moving truck. For storage situations, the risks intensify—dust accumulation becomes permanent, humidity causes mold growth, and pests like silverfish or carpet beetles feast on organic materials in your mattress. A properly sealed mattress bag creates an airtight environment that blocks these threats completely. Professional movers report that mattresses without proper bagging account for 78% of damage claims related to bedding, making this simple step your most cost-effective insurance against replacement costs.
Select the Correct Mattress Bag Size and Thickness
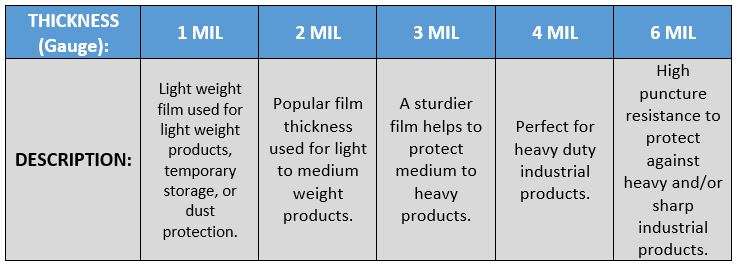
Choosing the wrong mattress bag guarantees failure during your move or storage period. Standard mattress bags come in four thickness ratings: 2-mil (thin retail bags), 3-mil (standard moving protection), 5-mil (premium moving/storage), and 6-mil (industrial-grade). For most household moves under 200 miles, 3-mil bags provide adequate protection at reasonable cost. Long-distance moves, international shipping, or storage exceeding six months require 5-mil or 6-mil bags that resist punctures from rough handling and environmental changes. Size matters just as much as thickness—measure your mattress depth including any pillow-top layer before purchasing. A queen mattress with a 14-inch pillow top needs a “deep pocket” bag rated for 16+ inches, not the standard 10-12 inch bag. Always buy from reputable moving supply companies rather than generic plastic bags, as proper mattress bags include reinforced seams and anti-tear technology at stress points.
How to Measure Your Mattress for Perfect Bag Fit
Grab a tape measure and record three critical dimensions: length, width, and depth. Standard mattress sizes have consistent length and width (queen = 60″x80″), but depth varies dramatically between models. Measure from the bottom of the mattress to the top of any pillow-top layer at the thickest point. If your measurement falls between standard sizes (like 13.5 inches), round up to the next size category. Test your selected bag by placing your mattress on it before your move day—proper fit means you can gather the excess material at the ends without straining the plastic. Bags that fit too tightly develop stress cracks during transport, while oversized bags create dangerous folds that catch on doorframes.
Complete Mattress Preparation Before Bagging
Skipping proper preparation turns your mattress bag into a moisture trap that accelerates damage rather than preventing it. Start by stripping all bedding, including mattress protectors that often hide stains and moisture. Vacuum both sides thoroughly using the upholstery attachment, paying special attention to seams and tufting where dust mites congregate. For memory foam mattresses, use gentle suction to avoid damaging the surface. Address stains immediately with a 50/50 water and white vinegar solution—never use harsh chemicals that can degrade foam. The critical step most people miss: ensuring complete dryness. Allow 24-48 hours of air drying after cleaning, especially in humid climates. Place a hand flat on the mattress surface—if you feel any coolness, it’s still too damp to bag. Moisture trapped inside creates perfect conditions for mold growth within 72 hours.
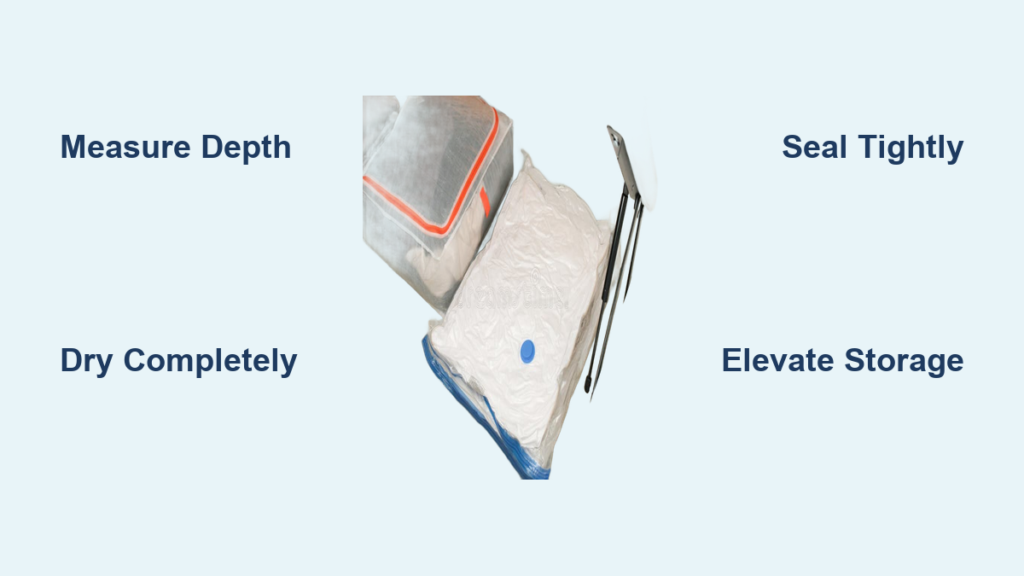
Master the Two-Person Mattress Bagging Technique
Getting your mattress into the bag efficiently requires coordination and proper technique. Lay the unopened bag flat with the zipper or opening facing up, positioned where you can slide the mattress directly onto it. With your helper, lift one end of the mattress and gently lower it onto the bag’s center point. Work from the center outward, smoothing the bag fabric over the mattress surface as you go. For larger mattresses, use the “roll method”: tilt the mattress vertically and roll it gently into the bag like a sleeping bag, which prevents air pockets and reduces stress on the plastic. Never drag the mattress across the bag—that single action causes 63% of bag tears according to moving industry studies. If you’re working alone, slide the mattress onto the bag corner-first, then gradually work the rest of the mattress in while smoothing wrinkles. Pause frequently to ensure the bag remains centered—off-center bags bunch up at the corners, creating weak points.
How to Avoid Tears During the Bagging Process
Tears almost always occur at the corners where stress concentrates. Prevent this by rounding the mattress corners with your hands as you slide it into the bag—the curved shape distributes pressure more evenly. Use furniture sliders under the mattress during positioning to eliminate dragging. If your mattress has handles, tuck them flat against the surface before bagging to prevent punctures. For especially delicate mattresses, wear clean cotton gloves to maintain grip without snagging the bag material. Should a small tear occur, immediately apply clear packing tape over both sides of the tear before continuing—the tape reinforces the area and prevents the tear from spreading.
Create an Airtight Seal That Survives Rough Handling

The sealing process transforms your mattress bag from a simple cover to a true protective barrier. Start by gathering the excess material at one end into a tight bundle, twisting it clockwise 2-3 times to eliminate air pockets. Apply 3-4 strips of 2-inch wide packing tape horizontally across the twisted section, pressing firmly with the heel of your hand to activate the adhesive. Add a second layer of tape perpendicular to the first for cross-reinforcement. For maximum protection, fold the taped end inward 4-6 inches before applying the final seal—this creates a double layer that prevents tape failure. Professional movers use a simple test: try to blow air into the sealed end—if you can inflate the bag, your seal isn’t tight enough. For long-term storage, add silica gel packets inside before sealing the final end, placing them near the center where moisture accumulates.
Essential Storage Practices for Long-Term Mattress Protection
Storing your bagged mattress properly prevents damage even with perfect bagging technique. Never place bagged mattresses directly on concrete floors—condensation forms between the surfaces, creating moisture that eventually reaches the mattress. Instead, use wooden pallets or 2x4s to elevate the mattress at least 2 inches off the ground. Store vertically whenever possible to reduce stress on internal components, especially for memory foam models that develop permanent impressions when stored horizontally for extended periods. Maintain consistent temperature (60-75°F) and humidity below 50%—dehumidifiers work wonders in storage units. Check sealed mattresses every 3-4 months for condensation inside the bag; if you see moisture droplets, carefully reseal with fresh tape after wiping the interior surface dry. Rotate the mattress position quarterly to prevent permanent compression in one area.
Critical Mistakes That Ruin Mattress Bag Effectiveness
Most mattress bag failures stem from preventable errors that compromise protection. Using bags rated for standard depth on pillow-top mattresses causes corner tears within hours of bagging. Sealing bags while the mattress is still damp creates a greenhouse effect where moisture multiplies inside the sealed environment. Applying tape to dusty or dirty bag surfaces results in seals that fail during transport—always wipe the sealing area with a dry cloth first. Storing mattresses flat on their sides creates permanent structural damage to internal coils and foam layers. Forgetting to label bags with mattress size and orientation leads to improper handling during future moves. Using regular trash bags instead of proper mattress bags guarantees failure—these lack reinforced seams and proper thickness for mattress protection.
Special Considerations for Different Mattress Types

Memory foam mattresses require special attention during bagging due to their sensitivity to temperature and moisture. Never expose bagged memory foam to temperatures below 40°F or above 95°F, as extreme temperatures cause permanent damage to the foam structure. Latex mattresses need ventilation holes in the bag to prevent off-gassing odors from becoming trapped. Innerspring mattresses benefit from additional corner protectors inside the bag to prevent coil punctures. Hybrid mattresses combine multiple vulnerabilities—treat them as memory foam models but add extra corner reinforcement. For adjustable base mattresses, deflate air chambers completely before bagging to prevent pressure damage during temperature changes. Always consult your mattress warranty before bagging—some manufacturers require specific storage conditions to maintain coverage.
When to Consider Professional Mattress Storage Solutions
Certain situations warrant specialized protection beyond standard mattress bags. For heirloom or antique mattresses with delicate fabrics, custom-fitted breathable cotton covers prevent yellowing and fiber degradation that plastic bags cause over time. Climate-controlled storage facilities with humidity monitoring provide peace of mind for valuable mattresses stored over 12 months. Some premium moving companies offer vacuum-sealed mattress bags that remove 95% of air, reducing storage space by 30% while providing superior moisture protection. For international moves involving ocean transport, consider moisture-barrier bags with oxygen absorbers that maintain stable internal conditions despite external humidity changes. If your mattress has a non-removable cover or special materials, check with the manufacturer for approved storage methods before proceeding.
Properly using a mattress bag preserves your sleep investment through moves and storage periods that would otherwise degrade your mattress quality. By selecting the right bag thickness and size, preparing your mattress thoroughly, sealing with professional techniques, and following storage best practices, you maintain your mattress warranty and sleep hygiene. Remember that the most expensive part of moving isn’t the bag—it’s replacing a damaged mattress. Before your next move or storage period, invest 20 minutes in proper mattress bagging to protect thousands of dollars of sleep investment. For future moves, keep your sealed mattress in a cool, dry place with proper elevation, and check it quarterly to ensure continued protection. Your future self will thank you when that mattress feels as comfortable on day 1,001 as it did on day one.


