

Outdoor mattresses face relentless assault from moisture, humidity, and mold-inducing conditions that can destroy even quality bedding within weeks. Whether you’re outfitting a patio, preparing for camping season, or protecting an RV mattress during winter storage, waterproofing isn’t just optional maintenance—it’s essential preservation. Without proper protection, outdoor mattresses become breeding grounds for mold, lose their structural integrity, and require replacement far sooner than their indoor counterparts. This comprehensive guide walks you through every waterproofing method, from professional-grade encasements to budget-friendly DIY solutions, ensuring your outdoor mattress stays dry, comfortable, and mold-free through any season.
Why Outdoor Mattresses Need Special Protection
Outdoor environments subject mattresses to moisture challenges that indoor settings simply don’t create. Morning dew alone can leave a mattress surface soaked, while unexpected rainstorms, high humidity exceeding 80%, and ground moisture seeping up from below create constant assault on bedding materials. Standard mattress pads and covers designed for indoor use lack the impermeable barriers needed to repel this sustained moisture exposure.
The damage from moisture penetration happens faster than most people realize. Foam cores lose their shape and support characteristics permanently after sustained wetness, never recovering their original loft or comfort. Spring coils rust within weeks of moisture exposure, compromising the entire mattress structure. Fiber padding layers absorb water like sponges and become breeding grounds for mold that produces musty odors and potential health hazards. Even latex mattresses, which offer slightly better natural moisture resistance, succumb to mold growth when outdoor humidity penetrates their surface.
Beyond direct rain and dew, outdoor mattresses face condensation problems that indoor mattresses never experience. Temperature fluctuations between day and night cause moisture to form beneath mattresses placed on cold surfaces or within enclosed spaces. This trapped humidity accumulates without any visible water source, gradually saturating mattress materials from below. Proper waterproofing addresses all these moisture pathways simultaneously, creating comprehensive protection that preserves mattress life and sleep quality.
Choose Your Waterproofing Method
Selecting the right waterproofing approach depends on your specific outdoor situation, budget, and how frequently you use the mattress. Each method offers distinct advantages that make it better suited for particular applications.
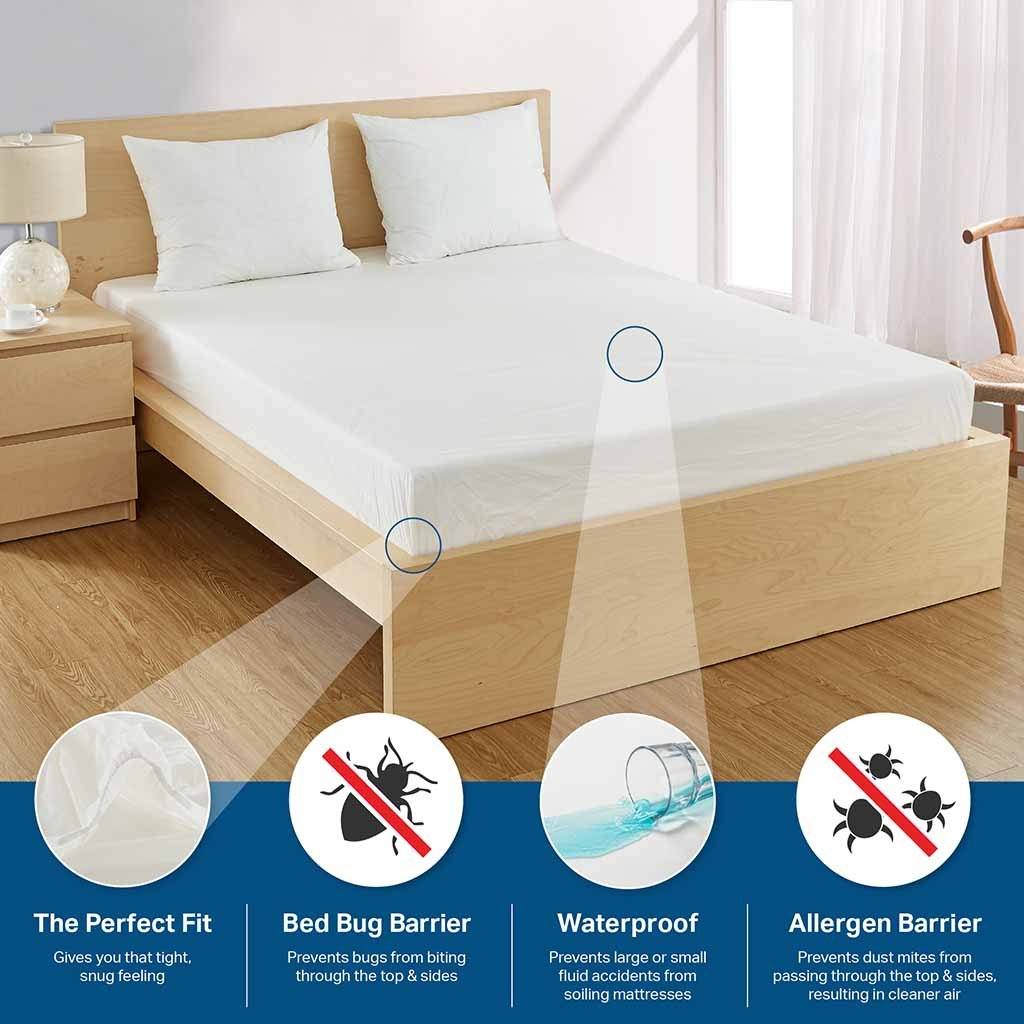
Mattress encasements provide the most complete protection by surrounding the entire mattress in an impermeable barrier. These zippered covers prevent moisture contact with any surface, including the bottom where ground moisture and condensation accumulate. High-quality encasements feature welded seams instead of stitched seams, eliminating the tiny holes that stitching creates even when sealed. The best materials include medical-grade vinyl, thermoplastic polyurethane, and coated fabrics with sealed coating layers. Encasements work excellently for RV mattresses, stored guest mattresses, and permanent outdoor furniture where removal and re-installation is practical. The primary drawbacks are higher initial cost and the bulk that may affect fitted sheet fit.
Spray-on treatments create hydrophobic barriers on fabric surfaces, causing water to bead and roll off rather than soaking in. These products range from affordable silicone-based sprays to premium fluoropolymer treatments and newer nano-technology formulations. Silicone sprays offer excellent water repellency at low cost but may stiffen fabrics slightly and degrade under UV exposure. Fluoropolymer treatments provide superior performance without significant fabric texture changes and resist both water and oil-based stains. Nano-coatings represent the newest category, bonding at the molecular level to create invisible barriers that don’t affect appearance or feel. Spray treatments work best for camping mattresses where weight matters, patio furniture where aesthetics matter, and seasonal use where reapplication is practical.
Liquid waterproofing applications involve brushing or rolling thicker coatings onto mattress surfaces, creating substantial barriers that resist punctures and wear better than spray treatments. Rubberized coatings, waterproofing paints, and specialized mattress solutions provide more durable protection that lasts longer before requiring reapplication. These products work particularly well on mattress sides and bottoms that receive less direct wear, as the thicker application doesn’t affect comfort on non-contact areas. The application requires more effort and drying time than sprays but results in more permanent protection.
DIY solutions offer cost-effective alternatives using household materials like beeswax and olive oil mixtures or vinegar-based sprays. These approaches work adequately for light-duty waterproofing needs but require more frequent reapplication than commercial products. Budget-conscious users can achieve decent protection by diluting commercial waterproofing products for larger coverage areas, though this reduces effectiveness proportionally.
Prepare Your Mattress Properly

Preparation determines whether your waterproofing treatment succeeds or fails within weeks. Skimping on this phase virtually guarantees treatment failure and wasted effort.
Begin by stripping all bedding, mattress pads, and existing protectors from the mattress surface. Vacuum thoroughly using an upholstery attachment to remove dust, dead skin cells, debris, and any particles lodged in fabric crevices or tufting points. Inspect the entire mattress for existing damage including tears, stains, compressed areas, and any signs of mold or mildew that need addressing before waterproofing.
Clean visible soiling with appropriate cleaners based on the stain type. Enzyme cleaners work effectively for biological stains including sweat, body oils, and pet residues. Mild detergent solutions handle general soiling on most fabric surfaces. Spot-clean stains gently without saturating the mattress, as excess moisture during cleaning will become trapped beneath waterproofing treatments. Allow the mattress to dry completely in a well-ventilated area, using fans or dehumidifiers if humidity levels are high. This drying period typically requires 24-48 hours depending on environmental conditions.
Any moisture present during waterproofing application becomes permanently trapped beneath the treatment layer, creating ideal conditions for mold growth and reducing treatment effectiveness dramatically. Test mattress dryness by placing a dry paper towel on the surface and leaving it for several hours—any moisture beneath will transfer to the paper towel. Only proceed with waterproofing when you’re certain the mattress is completely dry throughout.
Apply Spray-On Waterproofing
Spray-on treatments require consistent technique for uniform coverage and maximum effectiveness. Working outdoors or in a well-ventilated garage prevents inhalation of overspray and accelerates drying.
Shake the spray container thoroughly before use to ensure proper product composition and consistent application. Hold the spray nozzle 6-12 inches from the surface, maintaining consistent distance throughout application for even coverage. Apply in smooth, overlapping horizontal strokes, then follow with perpendicular strokes to ensure no areas receive inadequate treatment. Light, even coats work better than heavy single applications that cause dripping and uneven coverage.
Allow each coat to dry to the touch before applying the next coat, typically 30 minutes to two hours depending on product formulation and environmental humidity. Apply two to four coats for maximum protection, with each coat applied perpendicular to the previous coat direction to ensure complete coverage across all fabric fibers. Most products require 24-72 hours for full cure after the final coat before mattress exposure to moisture or replacement of bedding.
Avoid applying spray-on waterproofing in direct sunlight or extreme temperatures, as these conditions can cause uneven drying and reduced treatment adhesion. Morning or evening application in moderate temperatures produces best results. Protect surrounding surfaces and plants from overspray using drop cloths or plastic sheeting, as waterproofing sprays can permanently stain many materials.
Install Mattress Encasements
Encasements provide the most comprehensive waterproofing protection available, creating complete barriers between mattresses and environmental moisture. Proper installation ensures this protection extends to every surface without gaps or weak points.
Select an encasement size that matches your mattress dimensions precisely. Encasements that are too tight stress seams and zippers during installation and use, while loose encasements create folds where moisture can accumulate. Measure your mattress thickness, width, and length before purchasing, and compare these measurements against manufacturer sizing charts rather than assuming standard sizes.
Install the encasement by laying it flat with the zipper fully open, then carefully lower the mattress into the encasement bottom. Work the mattress into corners gradually, ensuring even distribution without forcing or stretching material. Close the zipper slowly, checking that no fabric is caught in the zipper teeth as it closes. Secure any zipper covers or flaps that create additional moisture barriers over the zipper line.
Inspect all seams after installation, checking for any gaps or areas where the encasement doesn’t lie flat against the mattress surface. Pay particular attention to corner seams and zipper areas, which experience the most stress during use and represent the most common failure points. Ensure the encasement bottom lies completely flat beneath the mattress with no bunching or folding that could create moisture pooling areas.
Seal Seams and Vulnerable Spots

Seams and edges require special attention during waterproofing because they represent the most common failure points in any waterproofing system. Even the best treatment or highest quality encasement will fail prematurely if seam protection is inadequate.
For sewn seams on treated mattresses, apply seam sealer products specifically designed for waterproofing stitch holes. Work the sealer into both sides of the seam using gentle pressure, ensuring penetration into all stitch holes and fabric layers. Allow the sealer to cure fully before stressing the seam, typically 24 hours for most products. Consider applying fabric tape or seam tape over treated seams after the base treatment cures, creating an additional barrier at these vulnerable points.
Mattress edges and corners receive more moisture exposure than flat surfaces, particularly when mattresses contact ground surfaces, furniture frames, or exterior walls. Apply additional waterproofing product to these areas during treatment application, building up slightly thicker protection where exposure is greatest. For encased mattresses, ensure edge seams are properly sealed and consider adding secondary protection using waterproof tape on exterior seams.
Check all existing seams on mattress covers before waterproofing, reinforcing any that show signs of wear or separation. Weak seams allow moisture penetration that defeats the purpose of surface waterproofing treatments. Address these issues before treatment application rather than hoping waterproofing will seal them adequately.
Test Your Waterproofing
Before relying on your waterproofing for actual outdoor exposure, verify its effectiveness through controlled testing. This step identifies treatment failures requiring correction before costly mattress exposure.
Test spray-on and liquid treatments by applying water to a small, inconspicuous area of the treated surface using a spray bottle. Watch how the water behaves—properly waterproofed surfaces cause water to bead and roll off rather than soaking into fabric fibers. Allow the test area to sit for several minutes, then check beneath the mattress for any moisture penetration through to the underside.
For mattress encasements, conduct a more rigorous test by filling the encasement with air, sealing it, and submerging it in water. Watch for bubble formation that indicates air escaping through leaks. Check encasement seams and zippers particularly carefully, as these areas most commonly develop leaks. Alternatively, close the encasement around a dry mattress, then spray water across all surfaces and check inside after several minutes for any moisture entry.
Address any areas that fail testing by applying additional treatment product, repairing damaged encasement sections, or re-treating entire surfaces if failures are widespread. Allow additional cure time after repairs before conducting follow-up testing. Only proceed with outdoor installation after testing confirms complete waterproofing effectiveness across all mattress surfaces.
Maintain Protection Long-Term
Even the best waterproofing requires regular maintenance to preserve its effectiveness over time. Establishing inspection and care routines prevents small problems from becoming mattress-destroying disasters.
Conduct monthly inspections during active outdoor use, checking for physical damage to waterproofing layers including tears, punctures, worn areas, and degraded sections where treatment has lost effectiveness. Pay particular attention to the center sleeping zone where body weight and movement stress waterproofing most heavily, edges where feet contact the mattress during entry and exit, and any areas that contact furniture frames or ground surfaces.
Clean mattress surfaces regularly to remove contaminants that abrade waterproofing layers or trap moisture against treated surfaces. Vacuum monthly using upholstery attachments to remove debris before it can damage waterproofing treatments. Address spills immediately using appropriate methods for your waterproofing system—encased mattresses can be wiped clean without moisture reaching the mattress, while treated surfaces require careful blotting to avoid disturbing waterproofing layers.
Reapply spray-on treatments when water begins soaking into fabric rather than beading, typically every few months for heavy outdoor exposure or annually for light use. Monitor treatment performance by checking how water behaves on treated surfaces during regular cleaning. Liquid coatings and encasements typically last longer but should be inspected annually and replaced or retreated when visible wear or reduced water resistance becomes apparent.
Waterproofing for Specific Outdoor Uses
Different outdoor applications demand waterproofing approaches tailored to their unique challenges and requirements.
Camping mattresses need lightweight, packable waterproofing that doesn’t add significant bulk to camping gear. Spray-on treatments applied before each camping season provide adequate protection without equipment weight. Ground sheets placed beneath camping mattresses create primary moisture barriers, with mattress waterproofing serving as secondary protection if ground sheets fail. Ensure adequate ventilation under camping mattresses by using elevated sleeping platforms rather than placing mattresses directly on ground surfaces.
Patio furniture mattresses face constant sun exposure in addition to moisture, requiring waterproofing products with UV inhibitors that prevent degradation from solar radiation. Products labeled for outdoor fabric use typically outperform indoor products in patio applications because they resist UV damage. Consider furniture design when selecting waterproofing approaches—mattresses with removable covers can be treated separately from foam cores, while permanently constructed furniture benefits more from liquid coatings applied in place.
RV mattresses require complete encasement waterproofing that protects against both use-period moisture and storage-period humidity accumulation. Marine-grade waterproofing products offer superior performance in RV applications due to their salt air resistance and UV protection. RV mattresses often fit tight spaces between walls and furniture, requiring waterproofing approaches that don’t significantly increase mattress dimensions. Add moisture absorbers inside RV storage compartments containing mattresses to reduce ambient humidity during storage periods.
Stored mattresses require waterproofing protection even in apparently dry storage areas. Temperature fluctuations create condensation that damages unprotected mattresses even without direct moisture exposure. Complete encasement provides the best protection for stored mattresses, creating barriers against both direct moisture and ambient humidity. If encasement isn’t available, wrap stored mattresses in plastic sheeting with sealed seams, though this approach traps some humidity and is less ideal than proper encasement.
Final Notes
Waterproofing outdoor mattresses requires matching protection methods to specific applications, preparing surfaces properly, and maintaining protection over time. Complete mattress encasements provide the most comprehensive protection but require investment in quality products and proper installation. Spray-on and liquid treatments offer more affordable alternatives that work well when properly applied to appropriate applications. Regular maintenance including inspection, cleaning, and timely reapplication extends both waterproofing effectiveness and mattress lifespan significantly.
The investment in proper waterproofing pays dividends through extended mattress life, improved sleep comfort, and avoidance of costly mattress replacement due to moisture damage. By understanding available methods and following proper application procedures, outdoor mattresses can provide years of comfortable service while remaining protected against moisture in even challenging outdoor environments. Take time to assess your specific situation, select appropriate waterproofing methods, and apply them carefully—your mattress (and your wallet) will thank you for years of dry, comfortable sleep under the stars or on the patio.


