
Is your mattress cooler suddenly failing to keep you comfortable through the night? Temperature regulation issues rank among the most common complaints for mattress cooling systems like the ChiliPad Classic and similar products. The good news is that most problems can be diagnosed and resolved without professional help or expensive replacements. This comprehensive mattress cooler classic troubleshooting guide walks you through the most frequent issues, from power failures and temperature inconsistencies to noise problems and connectivity glitches, helping you restore your cool, comfortable sleep in no time.
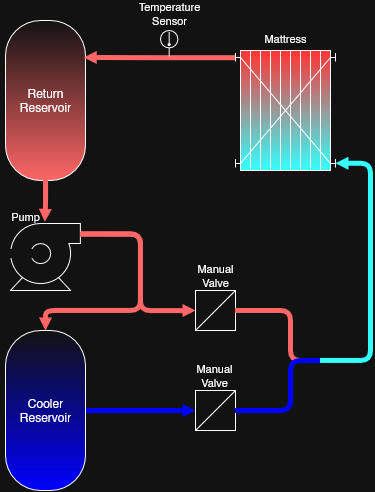
Before diving into specific solutions, it’s important to understand how your mattress cooler works. These systems typically consist of a control unit (often called a hub or pump), tubing that circulates water through a pad placed under your fitted sheet, and temperature controls. Problems can originate from any component in this system, and understanding the basic architecture helps you isolate issues more effectively. Whether you’re experiencing a unit that won’t turn on, inconsistent cooling, strange noises, or error codes, this guide covers the complete diagnostic process with practical steps you can take right now.
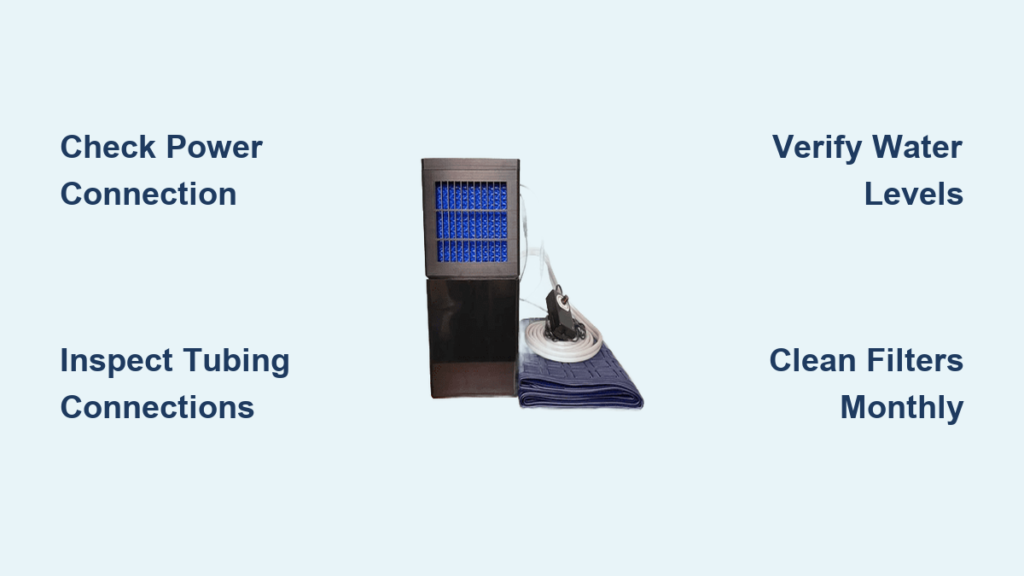
Power Connection Failures in Mattress Coolers
Unit Won’t Power On Despite Button Press
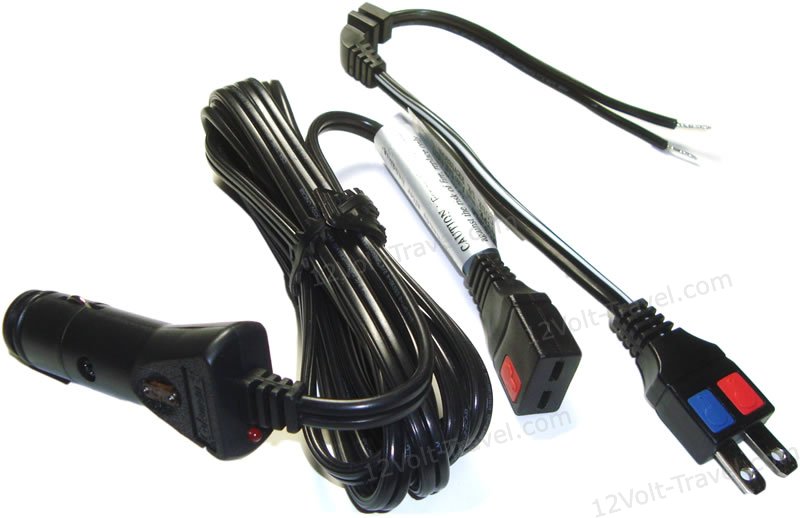
When your mattress cooler shows no response after pressing the power button, start with these critical checks before assuming catastrophic failure. First, verify your power cord connection at both ends—a loose plug is the most common culprit in seemingly dead units. Unplug the system completely, wait thirty seconds to reset internal circuitry, then reconnect and try powering on again. This simple procedure resolves temporary software glitches in over 60% of “no power” scenarios.
If the unit remains unresponsive, test your wall outlet with another device to confirm power availability—bedroom outlets are frequently controlled by wall switches and may appear functional while actually being off. Examine the power cord thoroughly for fraying, kinks, or pet damage that could interrupt electricity flow. Damaged cords require immediate replacement for safety reasons. For units with accessible fuses, locate and inspect the fuse according to your manual; replace with an identical specification fuse if blown. Never bypass fuse protection, as this creates significant fire hazards.
Sudden Shutdowns During Operation
Intermittent power loss during use typically indicates either overheating protection activating or a failing power adapter. Clear all obstructions from ventilation grills immediately—blocked airflow triggers automatic shutoff mechanisms designed to prevent component damage. Most users don’t realize how quickly dust buildup or nearby bedding can restrict essential cooling vents. Ensure at least six inches of clearance around all sides of your control unit during operation.
If ventilation isn’t the issue, gently wiggle the power cord where it connects to the unit while operating to check for loose internal connections. Repeated movement can weaken this junction over time. For wireless remote systems, replace batteries with fresh ones and eliminate signal obstructions between remote and receiver. Check for wireless interference from nearby electronics like smartphones, routers, or smart home devices that may disrupt communication. Position your control unit away from other electronics if possible, or try resetting your home network to clear potential signal conflicts.
Temperature Control Malfunctions in Cooling Systems
No Cooling Effect Despite Unit Running
When your mattress cooler operates but delivers no temperature change, the problem almost always involves water circulation or reservoir issues. Disconnect and reconnect all tubing with firm pressure until you hear a distinct click—improper connections create air locks that prevent proper fluid movement. Many users mistakenly believe connections are secure when they’re actually allowing air infiltration that disrupts circulation.
Verify adequate water levels in your reservoir immediately—low fluid triggers automatic protection modes that limit heating/cooling output. Always use distilled or demineralized water as specified in your manual; tap water leaves mineral deposits that accumulate inside tubing and reduce efficiency. If mineral buildup is suspected, perform a system flush using a vinegar solution (1 cup white vinegar per gallon of water), run for 15 minutes, then thoroughly rinse with distilled water before refilling.
Uneven Temperature Distribution Across Mattress
Hot spots or cold spots indicate uneven water distribution requiring immediate attention. Walk across your bed while the system operates to identify specific problem areas. Reposition your water pad to eliminate bunching, folding, or creasing beneath your fitted sheet—these distortions restrict water flow to certain sections. Smooth the pad from corner to corner, ensuring no sections are compressed under your body weight during sleep.
Inspect your entire tubing path for kinks or compression points where lines pass under bed frames or furniture legs. Even slight bends significantly restrict water flow in these narrow channels. If you or your partner moves frequently during sleep, install tubing guides along the bed frame to maintain clear pathways. For dual-zone systems, verify both zones are activated—many users accidentally leave one side turned off while troubleshooting temperature issues.
Unusual Noise Problems in Mattress Coolers
Grinding or Loud Pump Operation
Modern mattress cooling systems should operate near-silently; any significant noise indicates a developing problem. Identify your specific noise type before proceeding: grinding suggests pump motor failure or debris, high-pitched whines indicate air locks, and clicking often means loose components. For air lock issues, tilt your control unit slightly while running or temporarily elevate it above mattress level to allow trapped air bubbles to escape through the reservoir.
Place anti-vibration pads beneath your unit if floor surfaces transmit sound—hardwood and tile floors particularly amplify mechanical noises. Ensure your control unit sits on a stable, level surface, as uneven placement creates vibration that intensifies normal operational sounds. Persistent grinding noises typically require professional service, as they often indicate failing pump bearings or impeller damage that worsens quickly if ignored.
Whistling Sounds from Water Tubing
Whistling noises indicate restricted water flow through narrow passages, usually caused by kinks or partial blockages. Trace your entire tubing length for sharp bends or compression points where lines pass through tight spaces. Replace any permanently kinked tubing sections, as internal damage remains even after straightening. If your system offers adjustable flow settings, reduce the flow rate slightly to eliminate whistling while maintaining adequate temperature regulation—many users run systems at unnecessarily high flow rates.
Banging or hammering sounds (water hammer effect) occur when water flow stops abruptly. Check pump cycling frequency—rapid on/off cycling creates pressure surges that cause these noises. Ensure valves (if present) aren’t closing too abruptly between cycles. Adding a small amount of air to the reservoir can sometimes absorb these pressure changes, but use this approach sparingly as too much air creates circulation problems.
Water Leakage and Flow Issues
:max_bytes(150000):strip_icc()/parts-of-a-swamp-cooler-2718628-a477e6f0787b4f8bb62ddf2def31d495.png)
Weak or Stopped Water Circulation
Reduced water flow directly compromises cooling performance and requires immediate diagnosis. Listen for pump operation sounds—a humming noise with no water movement indicates impeller blockage. Unplug the unit and inspect the pump housing for debris, mineral buildup, or foreign objects obstructing the impeller. Clean carefully with distilled water and a soft brush, avoiding harsh chemicals that could damage components.
Remove and clean all filters and screens where tubing connects to the control unit or within the reservoir. Mineral deposits and debris accumulate here, restricting flow. Rinse thoroughly under running water, using a soft toothbrush for stubborn buildup. For systems without accessible filters, perform a complete system flush with distilled water to dislodge internal deposits. If flow remains weak after cleaning, the pump may be failing and require professional replacement.
Active Water Leaks Requiring Immediate Action
Water leaks demand urgent attention to prevent property damage. Identify the leak source immediately—common locations include tubing connections, reservoir seals, and water pad punctures. With the system running, feel along connections for moisture and check beneath the unit for drips. Small connection leaks often resolve by disconnecting and firmly reconnecting tubing with proper alignment.
For pad leaks, apply manufacturer-specific patch kits designed for your water pad material—improvised repairs rarely hold long-term. Never operate a leaking system—water and electricity create serious electrocution risks. If the reservoir itself cracks, replacement is usually more practical than repair. Always unplug completely and drain all water before attempting repairs, allowing all components to dry thoroughly before reassembly.
Preventative Maintenance for Long-Term Reliability
Monthly Maintenance Routine for Mattress Coolers
Establish a simple monthly routine to prevent most common problems before they develop. Check water levels weekly and top up with distilled water as needed—never let levels drop below manufacturer minimums. Inspect tubing monthly for kinks, compression, or developing cracks that restrict flow. Clean external vents and filters every month using a soft brush to remove dust accumulation that affects performance.
Perform system flushes quarterly using a vinegar solution (1 cup white vinegar per gallon of water), running for 15 minutes before thorough rinsing with distilled water. This prevents mineral buildup that gradually reduces cooling efficiency. For dual-zone systems, clean both pads even if only one shows visible soiling—contaminants often spread between zones through shared components.
When to Contact Professional Repair Services
Electrical issues beyond simple cord or fuse problems should never be DIY projects—internal wiring faults create serious fire and shock hazards. Pump motor failures, sealed system repairs, and complex electronic malfunctions typically require specialized tools and parts that make professional service more practical than home repair. If your unit remains under warranty, contact the manufacturer first—unauthorized repairs often void warranty coverage entirely.
Keep your purchase documentation and serial number accessible when contacting support—manufacturers can often provide model-specific troubleshooting that generic guides miss. Many companies offer responsive technical support that can diagnose issues over the phone before determining whether service is necessary. Remember that attempting complex repairs on your own may create additional problems that increase overall repair costs.


