
That annoying space between your mattress and headboard isn’t just unsightly—it’s become your personal lost-and-found department for phones, remotes, and reading glasses that vanish overnight. If you’ve ever reached under your bed at 2 a.m. searching for your fallen phone, you know exactly how frustrating this common bedroom problem can be. Whether your mattress has compressed over time, your frame has shifted, or you simply bought a mattress that doesn’t perfectly match your frame dimensions, this guide delivers practical, immediate solutions to seal that gap permanently. Most fixes require minimal tools, take less than 30 minutes, and cost under $20—meaning you can eliminate this bedroom headache before your next movie night.
Identify Your Specific Gap Problem and Cause

Before grabbing the first solution you see, determine exactly why your gap exists and how severe it is. Gaps typically develop from four main culprits: natural mattress compression after months of use, loosened frame bolts creating instability, mismatched mattress-frame sizing, or improper headboard positioning. Grab a tape measure and check your gap at multiple points along the headboard—many gaps vary significantly from one side to the other due to uneven settling.
Small gaps under one inch often respond to simple filler products or non-slip pads that prevent mattress movement. Medium gaps measuring 1-3 inches require dedicated gap fillers designed specifically for that size range. Large gaps exceeding three inches usually need multiple solutions working together or structural frame modifications. Snap a photo of your gap situation before shopping—it helps store staff recommend the right products when they can see your exact problem.
How Mattress Compression Creates Gaps Over Time
Your mattress naturally loses height as internal materials compress with regular use, especially if it contains memory foam or latex layers. This settling typically happens unevenly, with the head section compressing more if you frequently sit up in bed. As the mattress thins at the top while the frame remains constant, a gap opens between the mattress edge and headboard.
Check for visible compression by pressing firmly on different mattress areas—noticeable differences in firmness indicate uneven wear. If your mattress has lost more than 1-2 inches of height overall, consider whether a gap filler alone will suffice or if you need to address the mattress’s condition directly. Most quality mattresses maintain their original height for 5-7 years before significant compression occurs.
Frame Misalignment That Causes Gradual Shifting
Loose frame bolts and shifting components create gaps even with a perfectly sized mattress. Over time, regular movement transfers vibration through the frame, gradually working connections loose. Check all visible bolts with a wrench—if you can turn them more than a quarter-turn, they’ve become loose enough to cause mattress shifting.
Pay special attention to the connection points between the headboard and side rails, as this area experiences the most stress when sitting up in bed. Frames with wooden slats often develop gaps when slats shift out of position, creating uneven support that encourages mattress migration toward the foot of the bed.
Choose the Right Mattress Gap Filler Product

High-density foam gap fillers provide the fastest, most effective solution for most gap situations. These purpose-built inserts slide directly into the space between your mattress and headboard, conforming precisely to both surfaces to create a seamless barrier that blocks dust and lost items. Unlike makeshift solutions like rolled towels, quality foam fillers maintain their shape under pressure without creating uncomfortable ridges when you lean against the headboard.
Selecting the Correct Size and Density
Measure your gap width at three points—the center and both ends—before purchasing any filler product. Most gaps vary by up to half an inch across the mattress, so choose a filler sized for your widest measurement. Look for products labeled “high-density foam” rather than standard foam, as these maintain their shape for years instead of compressing within months.
Standard gap fillers accommodate mattress thicknesses from 8-14 inches, but specialty products exist for thicker luxury mattresses. Most come in neutral colors like gray or beige that blend behind pillows, though exact color matching matters less than proper sizing for effective gap closure.
Installation That Takes Seconds, Not Hours
Slide your gap filler into position with the tapered edge facing downward for easiest insertion. Adjust the positioning until it sits flush against both the mattress and headboard, creating a continuous surface without visible seams. For wider gaps, you may need to apply slight pressure to compress the filler enough for proper insertion—the foam will expand to fill the space completely.
Quality fillers stay securely in place without adhesives or fasteners, allowing easy removal when changing bedding. Most maintain effectiveness for 3-5 years under normal use before showing signs of compression that would require replacement.
Secure Your Mattress to Prevent Shifting
Preventing mattress movement often solves gap issues more effectively than filling them after they develop. Non-slip grip pads placed between your mattress and foundation create essential friction that anchors the mattress in position. These adhesive-backed pads work particularly well on platform beds where smooth surfaces offer little natural resistance to mattress movement.
Velcro Strap Systems for Permanent Positioning
Adjustable Velcro straps that wrap around your mattress perimeter and anchor to the frame create fixed connection points that resist separation forces. Install these by sliding the strap under your mattress at each corner, then securing the other end to your frame’s side rails. The hook-and-loop closure maintains tension through regular use while allowing quick release when rotating your mattress.
Tighten straps until they provide firm resistance when you try to shift the mattress, but avoid over-tightening that could damage mattress seams. Check strap tension every three months and adjust as needed to maintain optimal performance.
Corner Brackets for Structural Stability
Metal corner brackets installed at mattress-frame connection points provide the most permanent solution for severe shifting problems. These L-shaped brackets attach to both the mattress foundation and frame structure using included screws, creating mechanical anchoring that prevents separation. Installation requires only a screwdriver and takes about 15 minutes per corner.
Position brackets where the foundation meets the frame rails, ensuring they don’t interfere with your ability to lift the mattress for cleaning. Most kits include multiple bracket sizes to accommodate different foundation thicknesses and frame configurations.
Tighten and Adjust Bed Frame Components
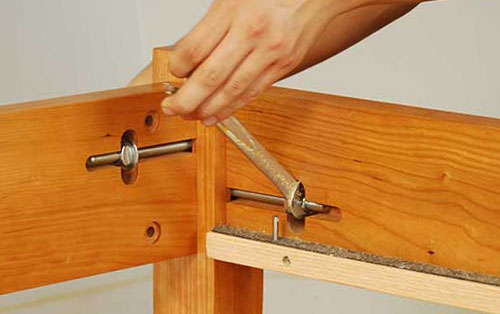
Loose frame components frequently contribute to gap problems, making stabilization essential. Tighten all visible bolts with the appropriate wrench—many frames use 10mm or 13mm sizes. Check connections between the headboard, footboard, and side rails, as these experience the most stress during regular use.
Slat Repositioning for Better Support
Frames with adjustable slat systems allow you to modify support positioning to minimize gaps. Slide slats closer to the headboard area to create more consistent mattress support that prevents downward shifting. Many modern frames feature sliding brackets that let you reposition slats without complete disassembly.
Ensure slats sit evenly across the frame with no gaps between individual slats, as uneven spacing creates weak spots that encourage mattress migration. Properly positioned slats should create a continuous, flat surface that matches your mattress dimensions exactly.
Adding Center Support for Larger Beds
Queen and king-sized mattresses often develop gaps when center support legs become insufficient for the mattress weight. Extend or add center legs that connect to the main support beam, bridging the gap between the beam and floor. This prevents frame bowing that creates uneven surfaces and contributes to gap formation.
Check that center supports sit directly under the beam’s midpoint and make solid contact with the floor. Wobble or instability in center supports accelerates frame shifting that worsens mattress gaps over time.
Prevent Future Gaps With Smart Maintenance
Establish a monthly inspection routine where you check for developing gaps before they become severe. Run your hand along the mattress-headboard interface—if you feel space developing, address it immediately with a temporary filler while investigating the root cause.
Rotate your mattress every three months to distribute compression evenly across the sleep surface, preventing the uneven settling that creates gaps. When rotating, flip the mattress end-to-end so the head becomes the foot, ensuring consistent wear patterns that maintain uniform thickness.
Control bedroom humidity between 30-50% to prevent moisture-related damage to both mattress and frame components. Excessive humidity softens wooden frame elements and accelerates wear, while extremely dry conditions can cause wood to crack and connections to loosen.
Avoid Common Gap-Fixing Mistakes
Never select gap fillers based solely on mattress size—always measure your actual gap dimensions first. Many gaps vary significantly across the mattress width, requiring different solutions for each side. Account for mattress compression under body weight by measuring the gap both when the bed is empty and when you’re sitting against the headboard.
Don’t apply surface solutions without addressing underlying structural problems. Tightening loose frame bolts might eliminate your gap entirely, making expensive filler products unnecessary. Inspect your entire frame system before investing in gap-specific solutions.
Never use household items like rolled towels or folded blankets as permanent gap fillers—they compress quickly, shift out of position, and create uneven surfaces that worsen the problem. Purpose-designed products provide superior performance and reliability despite their slightly higher cost.
Choose Your Best Solution Based on Gap Size
Small gaps under one inch typically resolve with simple foam fillers or non-slip pads. These solutions cost $10-$20 and install in minutes with no tools required. Medium gaps between one and three inches benefit most from adjustable gap fillers combined with mattress securing methods.
Large gaps exceeding three inches often require multiple approaches working together—install corner brackets to prevent shifting while using extra-wide gap fillers to seal remaining spaces. For rental properties, prioritize non-permanent solutions like gap fillers and Velcro straps that leave no marks when removed.
Consider your usage frequency when selecting solutions—guest rooms might only need aesthetic fixes, while your primary bedroom deserves more durable, long-term approaches. The most effective strategy combines immediate gap closure with preventative maintenance that addresses the root cause for permanent results.


