
Struggling with a stubborn air mattress valve can turn a simple camping trip or guest accommodation into a frustrating ordeal. Knowing how to open air mattress valve properly makes the difference between a comfortable night’s sleep and a deflated disappointment by morning. Most air mattress failures stem from improper valve handling rather than mechanical defects, yet few owners understand the specific techniques required for their particular valve type. This guide covers every valve configuration, provides foolproof opening procedures, and reveals solutions for common valve problems that plague air mattress owners.
Air mattress valves fall into four main categories, each requiring a distinct approach to open and operate correctly. The one-way valve dominates traditional designs while quick-release systems appear on premium models. Built-in pump mattresses simplify the process entirely, and larger beds often feature multiple valves for different chambers. Identifying your specific valve type before attempting to open it prevents accidental deflation and ensures efficient inflation. Most valve problems originate from improper handling rather than mechanical failure, making correct technique essential knowledge for any air mattress owner.
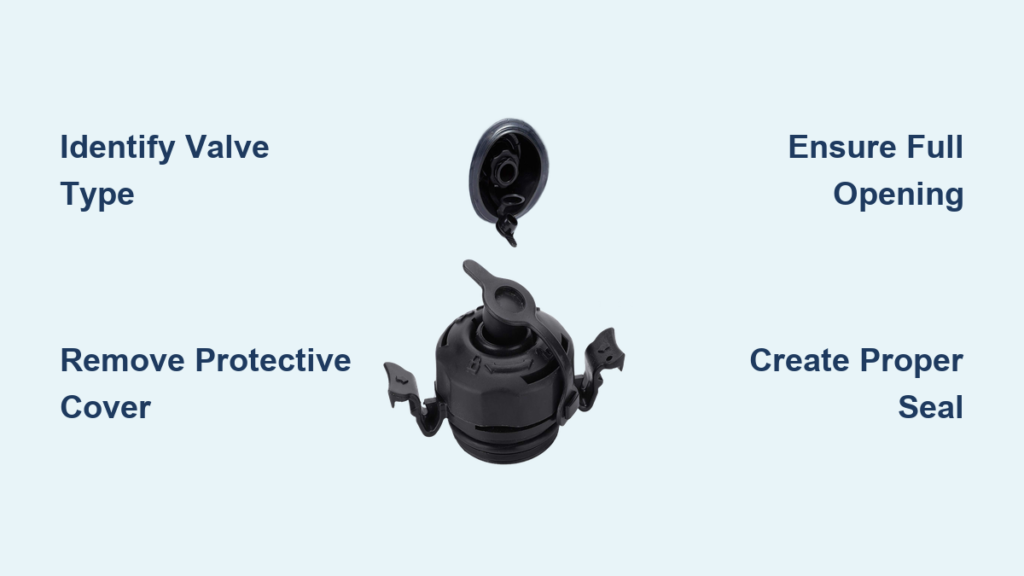
Identify Your Air Mattress Valve Type
Before attempting to open any valve, you must recognize which configuration your mattress uses. Each valve type has distinct characteristics that affect how you interact with it during inflation and deflation.
One-Way Valve Characteristics
The one-way valve represents the most common design found on traditional air mattresses. This mechanism allows air to flow into the mattress during inflation but automatically prevents escape once the pump disconnects. Inside the valve, a small flap or spring-loaded component closes when internal pressure exceeds external pressure, creating a natural seal without requiring manual closure. This design maintains inflation throughout the night because the seal improves as pressure builds inside the mattress. When opening a one-way valve, you must ensure the mechanism is fully open during inflation to maximize airflow—inserting a pump without fully opening the valve significantly restricts air intake and extends inflation time considerably.
Quick-Release Valve Systems
Premium manufacturers like Bestway incorporate sophisticated quick-release valve systems that separate inflation and deflation functions. These valves contain two distinct caps within a single housing unit, with one designated specifically for air intake and another for air release. This dual-cap design prevents the frustrating accidental deflation that occurs when users open the wrong valve port. The quick-release mechanism typically uses a twist-lock design that provides secure sealing when closed and allows rapid opening when needed. When opening a quick-release valve, identify which cap serves your intended purpose before removing either cover—opening the deflation port while attempting to inflate will release all air immediately.
Built-In Pump Valve Integration
Modern air mattresses increasingly feature integrated electric pumps built directly into the mattress sidewall. These systems eliminate manual valve handling entirely because the pump connects permanently to the internal valve mechanism. Users don’t locate or remove protective caps because the pump nozzle is permanently attached and designed to interface directly with the valve components. This design reduces valve-related air leaks since there are fewer opportunities for user error in seal creation. However, built-in pump systems require power access and add weight, making traditional valve systems preferable for camping or portable applications.
Multiple Valve Configurations
Larger air mattresses, particularly those designed for RV use or extended sleeping surfaces, often feature multiple valves positioned at different locations. These systems may have separate inflation and deflation valves, or valves accessing different air chambers within the mattress. When working with multiple-valve systems, open all air release points during deflation to ensure complete air removal from all sections. During inflation, use only the designated inflation valve, which manufacturers typically label or position in the most accessible location. Understanding your specific valve layout before beginning any inflation or deflation process prevents confusion and potential mattress damage.
Locate and Expose the Valve Assembly
Finding the valve on a deflated air mattress requires systematic inspection since the valve sits flush with the mattress surface when not in use.
Finding the Valve Position
On most air mattresses, the valve assembly sits along the side edge, typically near one corner for easy access during setup. Run your hand along the deflated mattress surface to locate the valve assembly, which has a slightly different texture than the surrounding vinyl or plastic material. The valve area may feel thicker or have a different surface texture due to the reinforced material surrounding the valve housing. Many manufacturers emboss the valve area with symbols or raised text indicating inflation direction, providing additional guidance for proper use. Take your time locating the valve before attempting to open it—rushing this step often leads to scratching the mattress surface or damaging the valve mechanism.
Remove Protective Valve Covers
Once you’ve located the valve, remove any protective covering before proceeding. Most valve covers twist clockwise to lock and counterclockwise to release, while snap-fit designs require pressing and lifting to remove. Apply steady, even pressure when removing the cover to avoid breaking any locking mechanisms built into the design. Some covers include small pull-tabs or textured edges that provide better grip, making them easier to manipulate with wet or slippery hands. Set the cover aside in a secure location where it won’t get lost—losing the valve cap leads to air leaks during use and allows debris to enter the valve mechanism. For quick-release systems, identify whether you’re working with the inflation or deflation port before removing either cover.
Verify Full Valve Opening
After removing the protective cap, confirm the valve is fully open before inserting any pump nozzle. Some valves feature a rotating collar controlling airflow that must be rotated to the open position before inflation proceeds efficiently. A partially open valve restricts airflow significantly, extending inflation time and potentially causing pump overheating from working against resistance. The fully open position typically shows an alignment mark on the valve body lining up with an indicator on the rotating collar. When you can see the complete valve opening and feel no resistance when blowing air through it manually, the valve is ready for pump connection.
Create Proper Seal During Inflation
The critical step in successful air mattress inflation is establishing a tight seal between the pump nozzle and the valve opening.
Pump Nozzle Insertion Technique
Push the pump nozzle firmly into the valve, ensuring it seats completely and creates contact with the material surrounding the valve opening. Electric pumps with tapered nozzles generally create better seals than pumps with straight-sided nozzles, particularly when the nozzle diameter matches the valve opening. When inserting the pump, press it in firmly and hold it at a slight angle to maximize contact between the pump edge and the valve opening. Some users find that twisting the pump slightly as they insert helps the nozzle seat more completely against the valve interior. If you feel air leaking around the connection point during inflation, reposition the pump or improve the seal before continuing.
Handle Mismatched Sizes
When pump nozzles don’t match valve openings, adapters or modifications create the necessary seal. If the pump nozzle is smaller than the valve opening, wrap duct tape around the nozzle until it fits snugly and creates a complete seal when inserted. Test the fit by blowing through the connected assembly before beginning full inflation—any escaping air indicates an inadequate seal requiring additional tape layers. For pumps with nozzles larger than standard valve openings, purchase adapter pieces typically included with the mattress purchase or available from the manufacturer. Never force a larger nozzle into a smaller valve, as this damages both components and creates permanent fitting problems.
Maintain Seal Throughout Inflation
Electric pumps require you to hold the connection in place throughout the inflation process, as vibration or movement can break the seal. Hand pumps and foot pumps demand even more attention, requiring continuous pressure on the pump throughout each stroke to prevent air escaping back through the valve between strokes. The slower inflation rate of manual pumps means any air escaping around the valve connection significantly impacts total inflation time, making proper seal maintenance critical. For extended inflation sessions, periodically check the seal quality and adjust the pump position if you notice reduced airflow or hear escaping air.
Prevent and Fix Valve Air Leaks
Valve-related air leaks frustrate air mattress owners, but most originate from improper sealing or incomplete valve closure that you can prevent or repair.
Ensure Complete Valve Closure
After inflating your mattress, close the valve cover securely to prevent slow air loss throughout the night. Ensure the valve mechanism itself is fully closed before replacing the protective cap—a partially closed valve allows continuous air escape even with the cap in place. For quick-release valves, confirm that both caps are securely tightened after inflation, particularly the inflation port used during setup. The valve should click or snap into the closed position, indicating the sealing flap has engaged properly. Test closure by applying a small amount of air pressure and listening for escaping air before relying on the seal.
Detect Hidden Leaks
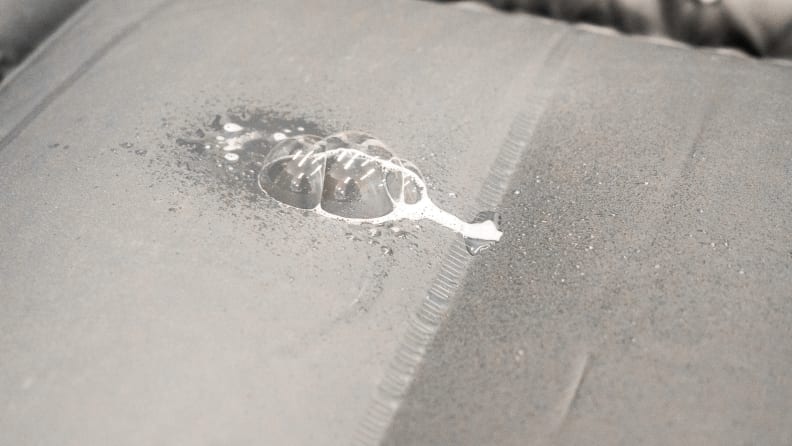
If your mattress deflates faster than expected, locate the leak by inflating fully and applying soapy water to potential problem areas. Wet the valve area thoroughly while the mattress is inflated and watch for bubbles indicating escaping air. Common leak locations include the valve seating surface, seams where material bonds, and any visible punctures or damage. A valve that allows air to escape during inflation before you close it likely has a damaged flap or spring mechanism requiring repair or replacement. Inspect the valve interior for debris, as small particles can prevent the flap from closing completely or create alternative pathways for air escape.
Temporary Leak Repairs
When valve problems arise away from home, several temporary solutions extend your air mattress life until proper repairs are possible. Duct tape wrapped around the valve opening (with the cap removed) creates a temporary seal for minor leaks, though this isn’t a long-term solution. For a valve cap that won’t stay in place, wrap plumber’s tape around the cap threads before screwing it on to create a more secure closure. If the valve flap itself malfunctions, placing a small piece of flexible material like a rubber band over the valve opening before replacing the cap provides additional sealing pressure. These temporary measures work best when you have access to proper replacement parts, so note the exact valve type and manufacturer for ordering correct components.
Manage Deflation Through Proper Valve Opening
Opening valves correctly during deflation speeds air release and ensures complete mattress flattening for storage.
Open All Air Release Points
When deflating your air mattress, opening all air release points significantly speeds the process and ensures complete air removal. For quick-release valves, open both the inflation and deflation ports to maximize airflow from the mattress interior. If your mattress has multiple valves positioned at different locations, open all of them before attempting to press or roll out the air. This approach allows air to escape from all chambers simultaneously rather than becoming trapped in sections distant from a single open valve. The more completely you open all release points, the faster and more thorough your deflation will be.
Speed Up Deflation Process
After opening all valves, press down on the mattress starting from the opposite end of the open valves to push air out systematically. Roll the mattress tightly from the far end toward the valves, using your body weight to squeeze remaining air through the open ports. Some users find that sitting on the mattress while it’s deflating helps force additional air out through the valves. For larger mattresses, having a second person press different sections while another person manages the valves speeds the process considerably. Continue rolling and pressing until no more air escapes, then close the valves before storing the mattress.
Temperature Effects on Deflation
Cold temperatures cause the air inside your mattress to contract, creating partial vacuum that makes valve flaps stick in the closed position. This can make re-inflation more difficult until the mattress warms up and internal pressure equalizes with external conditions. If you’re deflating a mattress that has been in cold conditions, allow it to warm to room temperature before attempting to open valves and remove air. Conversely, hot conditions cause expanding air to increase internal pressure, which can force valve flaps open if the seal isn’t completely secure. Understanding these temperature effects helps you anticipate and compensate for pressure changes that might otherwise seem like valve malfunctions.
Proper valve handling transforms air mattress maintenance from a frustrating experience into a straightforward task. By identifying your valve type, following correct opening and closing procedures, and implementing regular maintenance, you prevent the air leaks and inflation problems that plague many air mattress owners. The key takeaway is that most valve issues stem from improper technique rather than mechanical failure—understanding how your specific valve works and treating it accordingly ensures years of reliable service from your air mattress. When problems do arise, the troubleshooting steps outlined here address the most common issues without requiring professional repair or expensive replacement.


