
Sleeping soundly on your boat shouldn’t feel like a luxury reserved for calm nights at the marina. Many cruisers struggle with ill-fitting, uncomfortable mattresses that leave gaps against curved hulls or deteriorate quickly in humid conditions. Learning how to make a boat mattress solves this problem at its source—creating custom sleep surfaces that fit your vessel’s unique contours while withstanding marine challenges. This guide reveals the exact process to build a mattress that outperforms store-bought options, eliminating those frustrating pressure points and mold concerns that plague standard bedding on boats.
The difference between restless tossing and deep, restorative sleep often comes down to proper fit and material selection. Commercial marine mattresses frequently cost two to three times more than household equivalents while still failing to address your specific berth dimensions. By mastering how to make a boat mattress, you gain control over comfort, durability, and cost—transforming your cabin into a true sanctuary whether anchored offshore or docked for the season. Let’s dive into the proven techniques that turn foam and fabric into your perfect marine sleeping solution.
Select the Perfect Marine Foam for Your Berth

Choosing the right foam determines whether your boat mattress will deliver comfort for years or become a soggy disappointment after one season. Standard household foam breaks down rapidly in marine environments, but these specialized options withstand humidity and motion while providing quality sleep.
Marine-grade foam should be your top consideration for serious cruising. Engineered specifically for boat use, this foam resists mildew and mold even in poorly ventilated cabins. Unlike regular foam that compresses permanently when exposed to moisture cycles, marine-grade maintains consistent support and shape throughout its lifespan. While slightly more expensive upfront, it prevents the frustration of replacing a deteriorating mattress after just a few seasons.
Memory foam delivers exceptional contouring comfort that adapts to your body shape, but choose wisely for marine applications. Standard memory foam traps heat and moisture, creating ideal conditions for mold growth. Instead, select open-cell memory foam or gel-infused varieties that allow better air circulation. The Lull 10-inch memory foam mattress has proven successful for boat conversions—the uniform foam structure allows clean cutting without compromising integrity. When compressed for storage, quality memory foam typically returns to its original shape within hours.
Latex foam provides excellent breathability with natural mold resistance. Natural latex stays cooler than memory foam in warm climates while offering responsive support. Synthetic latex serves as a more affordable alternative, but verify quality specifications to ensure marine durability. Though more expensive initially, latex typically outlasts polyurethane options in humid environments, making it cost-effective over time.
Polyurethane foam works as a budget-friendly base layer when combined with comfort layers. Higher-density polyurethane provides better support and longevity than standard varieties. Many builders create layered constructions with firm polyurethane at the bottom for structural support topped with memory foam for comfort—replicating premium mattress performance at a fraction of the cost.
Cut Foam with Professional Precision
Your boat mattress’s fit depends entirely on accurate cutting—rushed work here leads to frustrating gaps and wasted materials. Follow these techniques to achieve professional results without expensive equipment.
Begin by laying your template on the foam and securing it with tape or weights. When cutting, always err slightly wide—you can remove more material but can’t add it back. For straight cuts, use an electric carving knife with steady, even pressure. The serrated blade cleanly separates foam without melting or tearing. Work slowly along your marked lines, allowing the blade to do the work rather than forcing it through the material.
For v-berth configurations, cut the main mattress section first using the widest part of your berth as a guide. The triangular shape naturally narrows toward the aft end, so position your foam accordingly before cutting. Memory foam mattresses like the Lull allow you to cut through the entire thickness without compromising structural integrity—simply lay the mattress over your existing cushions as a guide and follow the shape.
Critical mistake to avoid: Never use a hotknife for cutting mattress foam. Despite seeming logical for creating sealed edges, hotknives cause foam to melt along the cut line, creating ragged, crusty surfaces that complicate upholstery. The melting process also releases potentially toxic fumes. Experienced boat builders consistently recommend electric carving knives as the superior alternative that produces smooth edges ready for covering.
Build Multi-Layer Comfort Systems
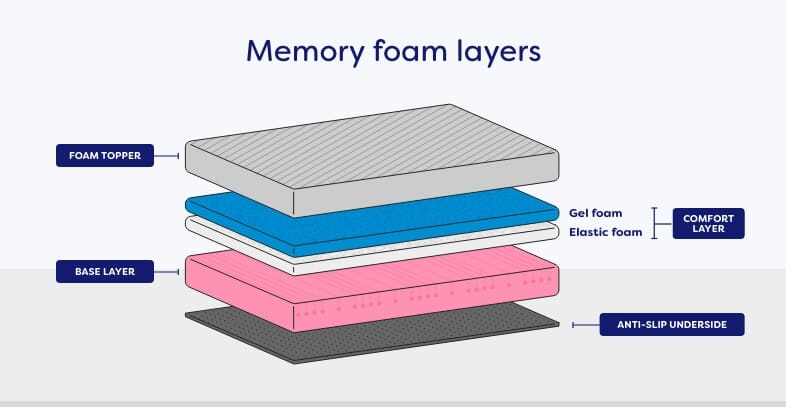
Single-layer foam mattresses often fail to deliver balanced support and comfort for marine use. Layered constructions solve this problem by combining different foam properties for optimal performance.
Start with a firm support base of high-density polyurethane (1.8-2.5 pounds per cubic foot density). This bottom layer maintains structural integrity and prevents the mattress from bottoming out on your berth’s hard surfaces. Cut this layer slightly smaller than your final dimensions to create a “picture frame” effect that provides edge support.
Add a comfort layer of memory foam (3-4 inches thick) on top for pressure relief and contouring. Open-cell memory foam allows better air circulation than traditional varieties, reducing moisture buildup. For couples with different firmness preferences, consider cutting the comfort layer into sections that can be customized individually.
Bond layers using 3M Super 77 spray adhesive applied evenly across both surfaces. Allow the recommended flash time before joining, then press firmly across the entire surface. Let the bonded mattress rest undisturbed for 24 hours to ensure complete curing. This creates a unified structure that performs as a single unit rather than separate layers shifting during use.
Sew Marine-Grade Removable Covers
Your cover fabric protects the foam while allowing necessary breathability—skip this step and you’ll face premature mold growth and foam deterioration. Outdura performance upholstery fabric represents the gold standard for marine covers, offering exceptional water resistance while maintaining breathability to prevent trapped moisture.
Construct covers with full-length zippers that allow complete removal for cleaning and airing. Position zippers along the least visible edge—typically the mattress bottom or side facing the hull. Use Lenzip #5 Black Continuous Molded Tooth Zipper Chain for corrosion-resistant performance in salt environments. Before sewing, baste fabric layers together with Seamstick basting tape to ensure perfect alignment.
For optimal results, double-stitch all seams at stress points like corners and zipper interfaces. This reinforcement distributes pressure and prevents seam failure during regular use. Add a moisture barrier layer beneath the foam using Moisture Prevention Underliner to block humidity rising from the hull. This simple addition significantly extends your mattress’s lifespan in damp environments.
Install for Maximum Comfort and Longevity
Proper installation transforms your carefully crafted mattress from a functional item into a seamless part of your boat’s sleeping system. Begin by placing a non-slip material like rubber shelf liner beneath the mattress to prevent shifting during movement. This simple step eliminates the frustration of constantly repositioning your mattress after each night’s sleep.
For v-berths, verify complete hull contact along angled sections. Gaps between mattress and hull create uncomfortable pressure points and allow moisture accumulation in concealed spaces. If your mattress doesn’t fully contact the hull, add thin foam shims cut to fit the gap—never force the mattress into position as this creates uncomfortable high spots.
Memory foam mattresses often require temporary compression for installation through companionways. Fold the mattress like a taco and secure with ratchet straps for transport below decks. Once in position, allow 4-6 hours for the foam to fully expand before adding bedding. Rushing this process leads to permanent creases that affect comfort.
Avoid Costly Construction Mistakes
Many DIY boat mattress projects fail due to preventable errors. Learning from others’ mistakes saves you time, money, and frustration.
Thickness-width interaction catches first-time builders off guard. Increasing mattress thickness from original cushion heights affects overall width—a thicker mattress extends further into the berth at each side. When increasing thickness, recalculate expected width and verify compatibility with berth dimensions before cutting foam. This becomes critical for v-berths where width naturally decreases toward the aft end.
Template accuracy makes or breaks your project. Double-check all measurements before cutting foam, using multiple measuring passes to verify dimensions. Test fit paper templates in your berth before committing to foam cuts. For complex shapes, create templates in sections that can be adjusted independently—this approach accommodates slight hull irregularities while minimizing foam waste.
Material selection determines long-term success. Never use standard household foam that lacks mold resistance. Marine environments demand specialized materials that withstand humidity cycles. When budget is tight, consider cutting memory foam toppers (available at Walmart) and bonding them to higher-density support foam using 3M Super 77 adhesive—this creates Tempurpedic-like performance at significantly reduced cost.
Creating your own boat mattress delivers superior comfort, perfect fit, and significant cost savings compared to commercial marine options. The initial investment in quality materials pays dividends through restful sleep on every voyage and a mattress that withstands years of marine use. Whether you’re outfitting a new-to-you cruiser or replacing worn original cushions, this DIY approach puts you in control of your sleeping comfort—no longer constrained by standard sizes or premium pricing. With proper materials, careful measurement, and attention to marine-specific requirements, you’ll transform restless nights into deep, restorative sleep regardless of where your adventures take you.


