
Standard mattresses leave you wrestling with awkward gaps, uncomfortable overhangs, or worse—completely incompatible sleeping spaces. If you’ve ever stared at your antique bed frame, RV bunk, or boat V-berth realizing no store-bought mattress will fit, you need a custom solution. Making a custom size mattress gives you precise control over dimensions, materials, and comfort while solving the frustration of mismatched sleeping surfaces. This guide reveals exactly how to create a perfectly fitted mattress for RVs, boats, antique beds, or any irregular sleeping space—whether you’re building it yourself or ordering professionally.
Measure Your Space for Zero-Gap Fit
Your custom mattress fails before it begins if measurements are inaccurate. Start by measuring the interior dimensions of your bed frame or platform at multiple points—length, width, and clearance height—since most frames aren’t perfectly square. For RVs with slide-out mechanisms, measure with the slide fully retracted to account for obstructions. Boat owners must trace hull contours directly onto cardboard to capture complex curves that standard measurements miss.
What to watch for during measurement:
– Corner obstructions requiring radius cuts (common in antique beds with decorative posts)
– Overhead clearance constraints limiting maximum thickness
– Depth variations across the sleep surface (critical for V-berth boat mattresses)
Mark all measurements clearly on your template with arrows indicating which side corresponds to head/foot positions. Double-check before cutting foam or placing orders—most manufacturers won’t accept returns on custom work due to measurement errors. For RV applications, verify whether you need a Short Queen (60″x75″) or standard RV Queen (60″x74″) by measuring existing mattress remnants.
Select Foam Type by Application Needs

Foam selection determines your mattress longevity and comfort—choose wrong and you’ll replace it prematurely. For RVs where heat buildup is common, gel-infused memory foam dissipates body heat 30% faster than conventional foam. Boat mattresses require high-density foam (HD36+) that resists moisture absorption in humid marine environments. Antique beds benefit from natural latex foam that maintains shape for decades under decorative bed frames with limited ventilation.
Match foam density to your specific use case:
– 1.5-2.0 lb/ft³: Budget option for temporary camping pads (lasts 1-2 years)
– 2.5-3.0 lb/ft³: Standard for RV and boat mattresses (3-5 year lifespan)
– 4.0+ lb/ft³: Heavy-duty truck sleeper applications (5+ years under constant use)
Purchase samples before committing—many suppliers offer 4″x4″ swatches for under $5. Test firmness by pressing your palm into the sample; quality foam should slowly conform then fully rebound within 30 seconds. Avoid polyurethane foam under 2.0 lb/ft³ density for permanent installations as it compresses irreversibly within months.
Cut Foam with Professional Precision
DIY foam cutting fails when edges tear or dimensions drift—use these techniques for clean results. Secure foam to a worktable with non-marring clamps before cutting. For straight edges on RV queen mattresses (60″x75″), use an electric carving knife with steady downward pressure along a metal straightedge. Make multiple shallow passes rather than one aggressive cut to prevent edge crumbling.
Critical cutting mistakes to avoid:
– Using dull blades that compress rather than slice foam
– Cutting curved boat mattress sections freehand (use template-guided jigsaws)
– Ignoring foam’s “memory” (cut oversized by 1/4″ then trim to final dimension)
For radius corners required in many antique beds, wrap painter’s tape around the foam edge at your target radius, then follow the tape line with a serrated knife. Always cut in well-ventilated areas—foam particles released during cutting can irritate lungs. Wear safety glasses to protect against flying debris when using power tools.
Build a Durable Mattress Cover That Lasts

Your cover makes or breaks the mattress—flimsy fabric stretches within months, creating sagging surfaces. For marine applications, use Sunbrella marine canvas that resists UV degradation and mold. RV mattresses need wipe-clean polyester-cotton blends to handle frequent use. Antique beds shine with organic cotton twill that breathes while maintaining structural integrity.
Follow this cover construction sequence:
1. Cut fabric 2″ larger than foam dimensions on all sides
2. Sew perimeter piping using 1/2″ cord for professional finish
3. Install heavy-duty #10 zipper along one edge for foam access
4. Reinforce corners with double-stitching and bartack reinforcements
For truck sleeper applications requiring frequent removal, add webbing handles at each corner. Boat mattresses benefit from grommets along the perimeter for tie-down straps during rough seas. Always pre-wash fabric to prevent shrinkage that would distort your carefully measured cover.
Install Corner Modifications That Actually Fit
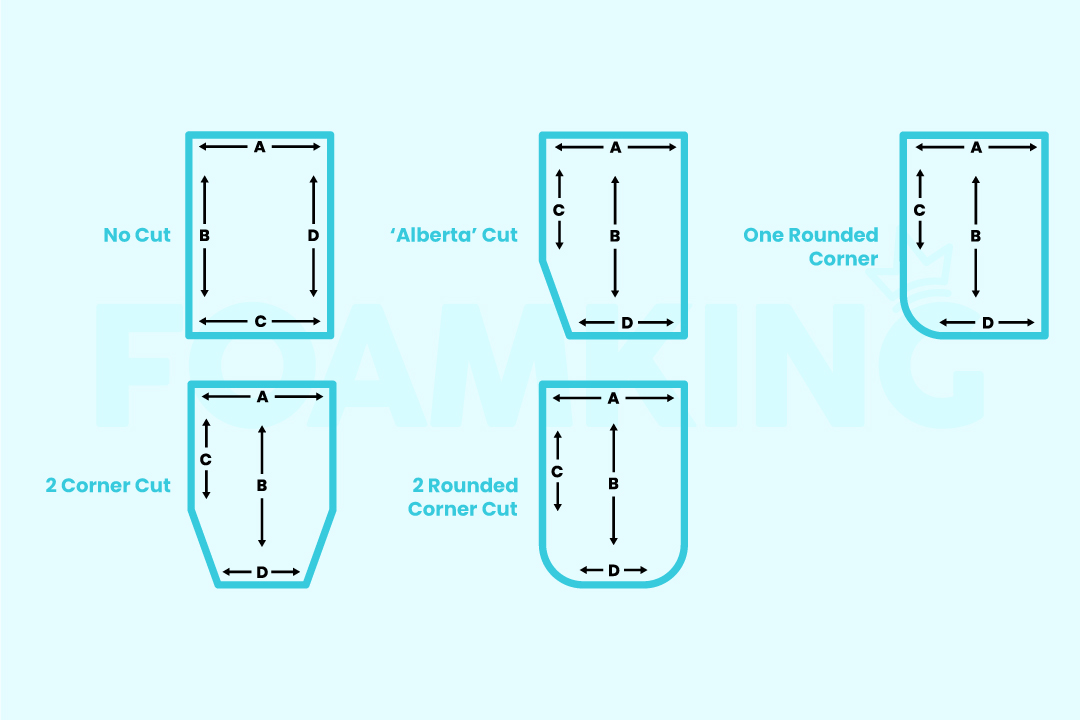
Standard square corners won’t work for most custom applications—master these specialized cuts. RV bunk beds (34″x74″) typically need 45-degree angle cuts at the foot corners to clear cabinetry. Boat V-berths require compound radius cuts that follow hull curvature—trace the actual space onto cardboard, then transfer to foam with chalk.
Execute perfect corner modifications:
– Notch cuts: Remove rectangular sections (2″x4″) to clear bed posts
– Radius cuts: Use compass tool to mark 3″-6″ radius for smooth transitions
– Tapered edges: Gradually reduce thickness at perimeter for sofa bed folding
Mark all cut lines with permanent marker before slicing. For complex boat mattress shapes, cut slightly oversized then sand edges smooth with 80-grit foam sanding block. Test-fit each section before final assembly—corner errors are impossible to fix after cover installation.
Maintain Your Custom Mattress for Longevity
Custom mattresses last 3-5 years longer with proper care—follow these application-specific routines. RV mattresses need monthly rotation since slide-out mechanisms create uneven weight distribution. Boat mattresses require weekly airing out to prevent moisture retention in humid environments. Antique beds benefit from flipping every 3 months to distribute wear across both sides.
Critical maintenance steps by application:
– RV: Vacuum seams weekly to remove road dust that degrades foam
– Boat: Apply marine-grade fabric protector every 6 months
– Antique: Use breathable cotton mattress pad to prevent fiber breakdown
– Truck sleeper: Check for compression points under枕 areas monthly
Replace covers immediately when stains penetrate beyond surface cleaning. Never fold mattresses not designed for it—permanent creases develop within weeks. Store seasonal mattresses (like vehicle camping pads) rolled loosely in breathable cotton bags, not compressed in plastic.
When to Choose Professional Custom Services
DIY fails for complex shapes requiring industrial equipment—know when to call professionals. Boat mattresses with compound curves need CNC cutting for precision impossible with hand tools. Antique beds with intricate scrollwork require specialist template expertise. RV conversions with integrated electrical components demand fire-retardant certified materials.
Professional services worth the investment:
– Multi-piece foam constructions requiring industrial bonding
– Mattresses over 8″ thick needing specialized layering
– Fire-retardant certified builds for commercial vehicles
– Complex hinge systems for folding sofa bed replacements
Reputable custom shops charge $200-$300 for basic 60″x75″ RV queen builds using quality foam. Expect 10-20% premiums for marine-grade materials or natural latex. Most offer 10-20 year warranties—verify coverage includes seam integrity and foam degradation. Avoid companies that don’t provide CertiPUR-US certifications for foam content.
Building your custom size mattress solves the frustration of ill-fitting sleep surfaces while giving you complete control over comfort. Whether you’re crafting an RV queen mattress with precise corner cuts or building a V-berth boat mattress that follows hull contours, accurate measurements and proper material selection make all the difference. Start with a template of your actual sleeping space, select foam density matched to your application, and either execute precise DIY construction or choose a professional service for complex shapes. Your perfectly fitted custom mattress will deliver years of restful sleep in spaces where standard sizes simply won’t work.


