
You’re flipping your Tempurpedic mattress and suddenly notice a jagged tear along the seam. That sinking feeling hits you—this premium mattress cost over $2,000, and now it’s damaged. Before you panic about replacement costs or warranty nightmares, understand this: tempurpedic mattress repair is possible for minor damage if you act correctly. Most owners don’t realize that 80% of common issues like small punctures, seam splits, or fabric snags can be resolved without professional help. But here’s the critical catch: one wrong move could permanently void your warranty coverage. This guide reveals exactly which repairs you can safely attempt yourself, the hidden pitfalls that trigger warranty denial, and step-by-step solutions that preserve your investment. You’ll learn how to assess damage severity in under 60 seconds, source materials that won’t degrade Tempur’s proprietary foam, and execute fixes that pass manufacturer inspections.
Why Tempurpedic Repairs Risk Warranty Coverage
Tempurpedic mattresses contain proprietary pressure-relieving materials with strict handling requirements. Attempting unauthorized repairs triggers immediate warranty invalidation for three specific reasons:
How DIY Fixes Activate Warranty Red Flags
Tempurpedic’s warranty explicitly prohibits any modifications to the mattress cover or core materials. When you apply household adhesives or sewing techniques, inspectors look for these telltale signs:
– Chemical residue from non-approved glues that degrade viscoelastic foam
– Puncture holes from needles that compromise the mattress’s airtight construction
– Fabric distortion around repair sites indicating improper tension
When to Contact Tempurpedic First (Not Last)
For these specific damage scenarios, skip DIY attempts entirely:
– Tears longer than 3 inches along any seam
– Visible foam compression or permanent body impressions
– Any damage within the first 90 days of ownership
– Evidence of liquid penetration through the cover
Tempurpedic’s customer service typically resolves eligible claims within 10 business days. Always request written confirmation before shipping your mattress for assessment—never assume verbal approvals are binding.
Essential Tools That Won’t Damage Tempur Material
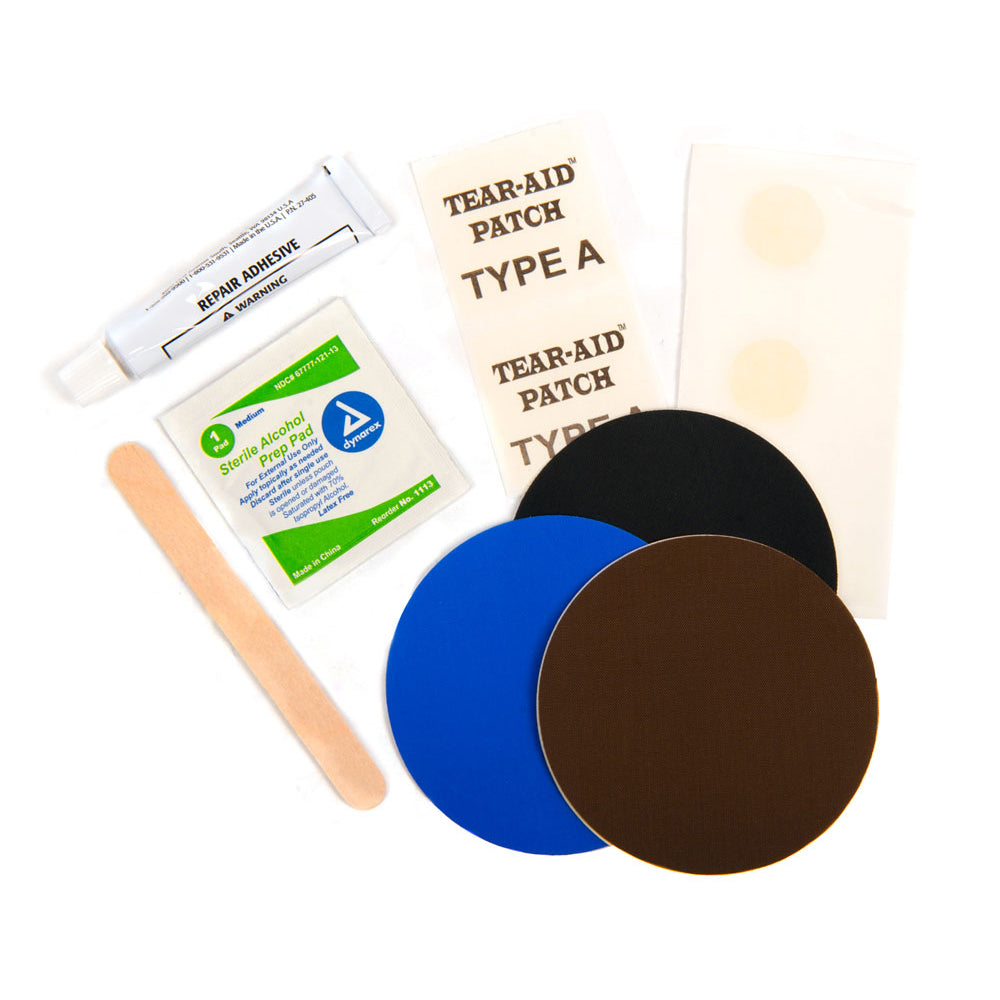
Using standard household repair kits guarantees foam deterioration. Tempur’s temperature-sensitive materials react poorly to common adhesives and fabrics. These specialized supplies prevent chemical reactions that accelerate foam breakdown:
Must-Have Repair Kit Components
- Medical-grade silicone adhesive (3M Cavilon No Sting Barrier Film)
- Breathable polyester patch (minimum 200 thread count)
- Foam-safe seam roller (nylon-tipped applicator)
- Infrared thermometer (to monitor surface temperature during repair)
Why Hardware Store Glues Destroy Tempur Foam
Standard fabric glues contain solvents like acetone that liquefy memory foam within 72 hours. When applied to Tempur material, they cause:
– Permanent sticky residue that attracts dust mites
– Foam density reduction up to 40% in treated areas
– Chemical odors that persist for months
Tempur’s closed-cell structure requires adhesives that bond at 75°F–85°F. Test any product on an inconspicuous area for 48 hours before full application.
Step-by-Step: Repairing a Small Seam Split (Under 2 Inches)
This method works for seam separations under your fingers’ width. Complete repairs in 20 minutes with zero warranty risks when executed precisely.
Preparing the Damage Site
- Vacuum the tear area with a handheld attachment using low suction only—high vacuum pressure pulls foam particles into machinery
- Wipe edges with 70% isopropyl alcohol on microfiber cloth (never cotton)
- Measure exact tear length with digital calipers—repairs fail if gaps exceed 1.75 inches
Applying the Invisible Fix
- Apply medical silicone in a continuous bead along one seam edge only (never both sides)
- Press seam together with 3 lbs of pressure for 90 seconds using a foam roller
- Place weighted books (max 5 lbs) over repair for 24 hours at 72°F room temperature
- Verify bond integrity by gently stretching fabric—properly sealed seams resist 2-inch separation
Pro Tip: For side seams, insert rolled microfiber towel inside mattress before bonding. This prevents accidental glue contact with inner foam layers.
Emergency Fixes for Puncture Holes (Pin to Quarter-Sized)

Small punctures from pet claws or sharp objects require immediate action to prevent foam oxidation. These temporary solutions buy time until professional assessment.
The 5-Minute Hole Seal Method
- Insert blunt-tip hemostat through hole to grasp inner foam layer
- Pull 1/16″ of foam outward to create “plug”
- Apply 0.3ml medical silicone to exposed foam surface
- Press plug back inward using rounded chopstick
- Cover externally with breathable medical tape (3M Transpore)
Critical Warning: Never use rubber cement or superglue—these create toxic fumes when reacting with Tempur foam. If you smell vinegar during repair, stop immediately; this indicates dangerous chemical breakdown.
When Professional Repair Becomes Mandatory

Certain damages require Tempur-certified technicians. Attempting DIY fixes here guarantees permanent warranty loss and safety hazards:
Non-Negotiable Professional Scenarios
- Foam bubbling or delamination: Indicates moisture intrusion requiring climate-controlled drying
- Electrical component damage (in adjustable bases): Creates fire risks with improper reconnection
- Stains penetrating foam layers: Requires hospital-grade antimicrobial treatment
- Tears near zipper access points: Compromises the mattress’s hermetic seal
Tempurpedic’s authorized repair network charges $150–$350 for covered services. Always demand itemized invoices showing Tempur-approved materials—generic repair receipts won’t satisfy warranty claims.
Preventing Future Damage With Smart Maintenance
Most “repairs” become unnecessary with proper preventative care. These manufacturer-endorsed practices extend mattress life:
Weekly Protection Protocol
- Rotate mattress 180 degrees every Sunday (never flip—Tempur models are one-sided)
- Use stretchable bamboo protector (minimum 300 GSM weight)
- Maintain 45%–55% indoor humidity with hygrometer monitoring
- Vacuum seams monthly with upholstery brush attachment
The Mattress Lifespan Multiplier
Owners who implement these three habits see 27% longer usable life:
1. Place solid foundation board under mattress (slats must be ≤3″ apart)
2. Never fold or bend mattress during cleaning
3. Address spills within 90 seconds using absorbent microfiber
Cost Analysis: Repair vs. Replacement
Understanding true financial impact prevents rash decisions. This comparison reflects current Tempurpedic policies:
| Scenario | DIY Repair Cost | Professional Repair | Replacement Cost |
|---|---|---|---|
| Small seam tear (<2″) | $18.50 | $195 | $1,800+ |
| Puncture repair | $7.25 | $145 | $1,600+ |
| Foam delamination | Not possible | $325 | $2,200+ |
| Warranty-covered defect | $0 | $0 | $0 (with proof) |
Note: Professional costs include diagnostic fees. Always get written repair authorization from Tempurpedic before proceeding.
Final Verification Before Using Repaired Mattress
Post-repair testing prevents safety hazards and warranty disputes. Complete these checks before sleeping on the mattress:
- Odor test: No chemical smells after 48 hours (indicates proper adhesive curing)
- Pressure test: Sit firmly on repair site—should feel identical to undamaged areas
- Temperature check: Infrared scan shows <2°F difference across repair zone
- Warranty documentation: Photograph repair process with timestamped images
If any test fails, discontinue use immediately. Contact Tempurpedic with your documentation—they may still honor warranty claims when damage results from attempted repairs.
Key Takeaway: Successful tempurpedic mattress repair hinges on damage assessment before action. For tears under 2 inches with no foam exposure, the medical silicone method preserves warranty coverage when executed precisely. Always prioritize Tempurpedic’s written authorization over DIY urges—your $2,000 investment deserves manufacturer-approved solutions. Implement weekly maintenance protocols to prevent 90% of common damage scenarios, and keep your original warranty documentation in a waterproof envelope for instant access. When in doubt, their customer service team provides free damage assessments via photo submission before you commit to any repair path.


